The 2500 saves captured images in the JPEG format (file extension jpg). The JPEG format uses a lossy compression for saving memory. In other words, a captured image will be compressed and then saved to a memory card. The compression process will cause some details in the original image to disappear. Consequently, if more compression is applied to an image, we save more space and the compressed image has lower quality. For critical work that requires higher image quality, less compression should be used. The 2500 provides three levels of compression (and, of course, image quality): FINE, NORMAL and BASIC. Image quality FINE uses less compression and has the highest quality. The compressed image has a size approximately a quarter of the original (i.e., 1:4). Because of this low compression, the image quality is higher, has less noise, and is good for larger prints. Image quality NORMAL uses more compression and generates a file whose size is approximately 1/8 of the original (i.e., 1:8). This is good for general applications. Finally, the image quality BASIC uses a high compression that compresses an image to its 1/16 (i.e., 1:16). Due to the lose of details, this is only suitable for e-mails and web pages. Note that the compression ratios mentioned above (i.e., 1:4, 1:8 and 1:16) depend on the image content and are not exact values.
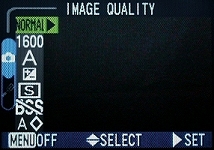
Use the following procedure to set image quality. It is available in both the A mode and M mode.

|
|
|
| The A menu | The M menu |


Let us use an example to illustrate the subtle differences of these three options. The benchmark image is the following one. Three 1600×1200 images were taken using FINE, NORMAL and BASIC. The marked portion of each image is cropped without editing.

|
| Click on the image to see a larger one |
The following shows the cropped results. Each of the following images has a marked area. The one using FINE is very clean, the one using NORMAL starts to show some noise, and, finally, the one using BASIC is quite noisy. In fact, the whole area contains many light color artifacts that are not part of the original image. Carefully compare the image using BASIC with the one using FINE and you will see the difference.
| FINE | 
|
| NORMAL | 
|
| BASIC | 
|
In summary, if image quality is important, use the FINE option. The NORMAL option should work fine for most cases. However, the BASIC option may only be good for smaller size images.