In the Auto mode and Scene mode, the camera automatically raises the internal flash when illumination is insufficient, and fire the flash. Consequently, there is nothing for a photographer to control over the internal flash. In what follows, we will assume the camera is in the Programming (P) mode, Aperture-Priority (A) mode, Shutter-Priority (S) mode, or Manual-Exposure (M) mode.
If you intend to use the internal flash, you must choose a flash mode, although in most situations it is as simple as point-and-shoot. The flash mode is selected by pressing the FLASH button on the lens unit.

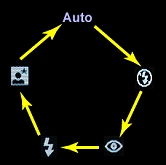
If the flash pop-up mode is Auto, the camera will raise the internal flash when it is necessary. Therefore, the selected flash mode is applied to the next shot that needs flash illumination. When the FLASH button is pressed, the five flash modes are repeated in the order as shown in the left diagram below. Hence, even though the internal flash has been raised, by pressing the FLASH button a number of times, you still can turn the flash on or off. Refer to the Overview page for the meaning of each icon.
|
|
|
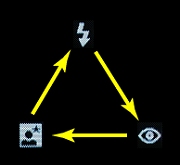
| In Auto pop-up mode | In Manual pop-up mode |
If the flash pop-up mode is Manual, the internal flash must be raised by pressing the FLASH button. Once the internal flash is raised, pressing the FLASH button will cycle through three flash modes as shown in the right diagram above. Why are only three modes? This is because in the flash pop-up Manual mode, if the internal flash is raised, it means you want the flash to fire. As a result, only the three modes that cause the internal flash to fire will be used. To turn off the flash (i.e., Flash Off), fold the internal flash down!
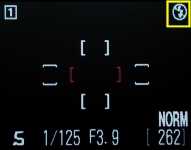
As the FLASH button is being pressed to select a flash mode, the corresponding flash mode is shown on the upper-right corner of the LCD monitor. In the screen-shot below, the selected flash mode is Flash Cancel. Note that if the flash pop-up mode is Auto and the flash mode is Auto, there is no icon shown on the LCD monitor.
Note that once a flash mode is set, it stays until the flash mode is changed by a new selection. Turning off the camera will not reset the flash mode.
With the flash Auto mode, the internal flash
fires when the camera detects that the illumination of the scene is
insufficient. The Auto with Red-Eye Reduction
mode is useful when shooting people. See the section
of Red-Eye Reduction for the
details. The red-eye reduction function is shown by an eye icon
 . With the
Anytime Flash mode, the internal flash always fires.
It is indicated by a flash icon
. With the
Anytime Flash mode, the internal flash always fires.
It is indicated by a flash icon  .
This mode is very useful for fill flash. For example, if you are shooting
backlight (i.e., a strong light source such as the sun is behind your
subject), the front part of your subject could be too dark (i.e.,
under-exposed). In this case, you can use the
Anytime Flash mode to illuminate
the front part of your subject. With the
Slow Synchronization mode,
icon
.
This mode is very useful for fill flash. For example, if you are shooting
backlight (i.e., a strong light source such as the sun is behind your
subject), the front part of your subject could be too dark (i.e.,
under-exposed). In this case, you can use the
Anytime Flash mode to illuminate
the front part of your subject. With the
Slow Synchronization mode,
icon  appears on the LCD monitor. Slow
synchronization is very useful when you are shooting in low light condition
and want to preserve the background and the ambient.
appears on the LCD monitor. Slow
synchronization is very useful when you are shooting in low light condition
and want to preserve the background and the ambient.
The use of the internal flash is very easy. However, a couple of useful hints may be very helpful. The internal flash can be used as fill flash as mentioned earlier. More precisely, even though lighting condition is good, we still can use the internal flash to open up shadows. In the left image below, strong sun light is near the upper-left corner (i.e., back light). Thus, +1 stop exposure compensation is applied to show the details; however, this washes out the background. To overcome this problem, we can use the internal flash Anytime Flash mode. The right image below shows the result. As you can see, the details of the main subject and the background are preserved.

|

|
| No flash (+1 stop compensation) | With Flash |
| Click on the image to see a larger one | |
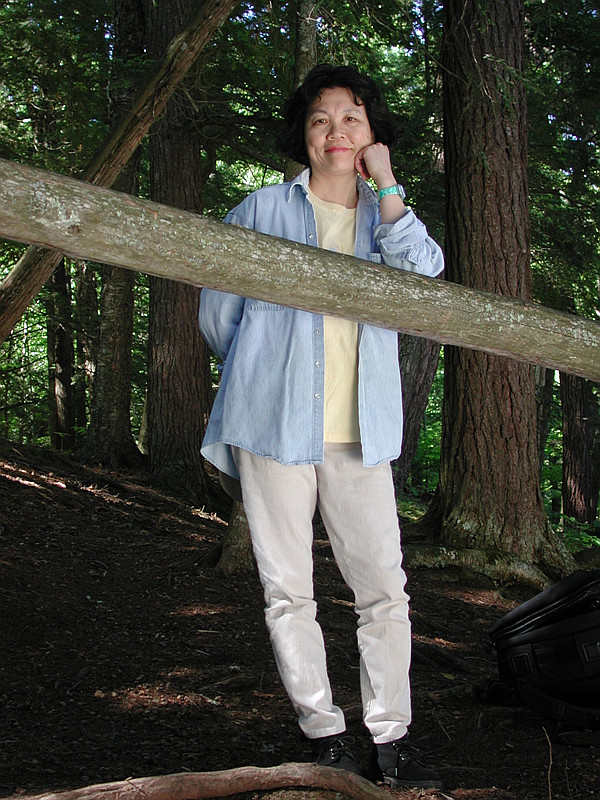
The left image below was taken in a forest. Illumination was good enough; but, contrast was low. To increase contrast and obtain more saturated colors, Anytime Flash was activated. However, because the background is far away and cannot be illuminated with the low power internal flash, the background is under-exposed even though fill flash is used. To capture the background, Slow Synchronization was used. Consequently, both the subject and background are properly illuminated as shown in the right image below. Note the Red-Eye effect. Unfortunately, the red-eye and slow synchronization options cannot be used at the same time with the 4500, and, as a result, when we use slow synchronization to capture the background, we lose the chance to remove red-eyes.

|
|
| Fill flash only | With slow synchronization |
| Click on the image to see a larger one | |
Because the flash synchronization shutter speed is either 1/60 sec or 1/125 sec, sometimes we can take advantage of this "faster" shutter speed. I tried to photograph the effect of water-drop in a rainy day. Since the lighting condition was not good, the shutter speed can only reach about 1/15 sec. The result is shown in the left image below. As you can see, the impact of a water drop blurs and does not show anything interesting. Then, I set the internal flash to the Anytime Flash mode to force the internal flash to fire. The faster shutter speed helps reveal the impact of a water drop.

|

|
| Without flash | With fill flash |
| Click on the image to see a larger one | |
Synchronization shutter speed is a product of the traditional curtain-based or leave-shutter cameras. Curtain-based cameras have two curtains. When the shutter is released, the first curtain moves and the second follows. These two curtains form a gap exposing the film to incoming light. As both curtains move, this gap moves as well. As this gap moves, a portion of the film is exposed to the incoming light and records an image of that portion. Thus, the size of this gap determines the shutter speed and vice versa. A larger (resp., smaller) gap exposes the film longer (resp., shorter) to the incoming light, and hence corresponds to a slower (resp., faster) shutter speed. Since the duration of a flash is very short, the gap formed by the two curtains must be wide enough to cover the whole film area in order to expose the film to the flash illumination completely. The size of this wide-open gap determines a shutter speed, the flash synchronization shutter speed. This shutter speed is usually 1/60 sec to 1/250 sec. If the selected shutter speed has its corresponding gap smaller than the whole film area, only a portion of the film is exposed to the incoming flash light, and the image exposure is incomplete. On the other hand, if the selected shutter speed has its corresponding gap larger than the film area, after the first curtain reaches its destination, the second curtain will stay put for a little longer and then moves to close the exposed area. Therefore, in addition to expose to the flash light when the first curtain reaches its destination, the film will also receive some ambient illumination after the flash stops firing and before the second curtain starts its movement. This is the so-called slow synchronization.
Most consumer type digital cameras, the 4500 included, do not use curtains. Instead, they use a combination of electronic shutter and leave-shutter, There is virtually no restriction to what shutter speed should be in order to use flash properly. In other words, we can use any available shutter speed. If the shutter speed is equal or faster than the synchronization speed, we have a normal flash result. If the selected shutter speed is slower than the synchronization speed, we have the slow synchronization effect. There is an example here to illustrate this concept.
We have no control over the internal flash in the Program (P) mode because the camera selects both the aperture and shutter speed. However, in the Flexible Program (P*) mode and the Aperture-Priority (A) mode, we can adjust aperture to control depth-of-field. Once an aperture value is selected, the camera will control the output level of the internal flash to match the selected aperture. Therefore, the aperture-priority mode is the most natural and the traditional way of using flashes. We can certainly use the internal flash in the shutter-priority (S) mode, In this mode, we adjust shutter speed and the camera finds a matching aperture. Therefore, we can easily do slow synchronization by ourselves. In the Manual-Exposure (M) mode, we can adjust both aperture and shutter speed. This provides us with maximum freedom; however, improperly selected aperture-shutter speed combination will produce over- or under- exposed images. So, use this mode with care.