Before we can explain how to use Coolpix 950, we need to know the locations and functions of various dials and buttons. We shall go through each button once with a brief explanation. However, for most of the cases, you really do not have to know the meaning and function of each button. So, please just browse the names and know the locations of these dials and buttons.
All control dials and buttons of this camera are either on the top panel or on the backpanel, except for a dial which is located in the front.
![]()
The following shows the top panel of the camera.
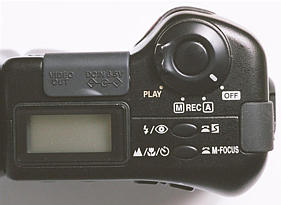
The top panel has the mode dial and shutter release button (upper right), the flash setting button (middle), the focus setting button (bottom), and the control panel. Underneath the two rubber covers are exterry power connector, video output and digital I/O connector.
The most frequently used dial and button are located on the top panel as shown in the following figure. The Mode Dial can be rotated and has four positions: OFF (turning off the camera), A-REC (automatic mode), M-REC (manual mode), and PLAY (playing back).
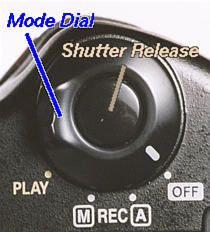
The center of this mode dial is the Shutter Release Button. Pressing it halfway down activates focusing and exposure metering. Fully press this button to take a photograph.

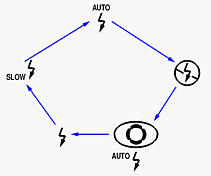
There are five settings available: auto flash, flash off, auto flash with red-eye reduction, anytime flash, and slow synchronization. Click here to see the details.
Auto flash is the default when the camera is turned on. The setting changes each time the button is pressed, cycling through the different flash modes as follows:
The focus setting button is below the flash setting button (see the figure below). It can be used in both A-REC mode and M-REC mode.

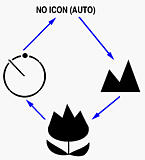
This button serves three different purposes. The first is to select a focus setting. The setting changes each time the button is pressed, cycling through the focus modes as follows. It starts with no icon, which means the camera uses autofocus. Press the button once to move to infinity setting so that the focus is fixed at infinity. The next mode is for close-up or macro mode. The last mode is Self-Timer, which is not part of the focus setting. This button can also be used with the Command Dial (see below) for Manual Focus.
![]()
The controls on the back panel consist of two rows as shown below. The top row has the Zooming button, the MONITOR button and the MENU button, while the bottom row has the QUAL button, the MODE button and the exposure compensation button +/-. In the middle of the back panel is the LCD monitor.
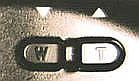
Near the upper-right corner of the back panel there are two buttons marked with W and T for zooming out (wide angle) and zooming in (telephoto), respectively. See the figure below.
In the upper-left corner of the back panel is the MONITOR button (see the figure below). This button controls the content to be displayed on the LCD monitor. It can be used in the A-REC mode, M-REC mode, and PLAY mode. However, the displayed information on the LCD monitor are different. By default, information of the current settings and playback settings are shown on the LCD monitor when the camera is turned on. Press MONITOR once to remove these information from the LCD monitor. Press it again to turn off the LCD monitor. When the LCD monitor is on, the camera focuses continuously, which consumes battery power. The LCD monitor consumes power as well. Therefore, if it is possible, you might consider to turn off the LCD monitor and use the viewfinder to save battery.

In the middle of the top row of buttons on the back panel is the MENU button (see the figure below).

Each of the three modes (i.e., A-REC, M-REC, and PLAY) has its own menu for setting some control information. Please refer to A-REC Menu, M-REC Menu, and PLAY Menu for the details.
The bottom row on the back panel of the camera has three buttons.
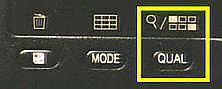
Button QUAL is the right-most one. Combined with the command dial it is used for selecting the image quality (i.e., image resolution). Please see Selecting Image Quality for the details. However, in the PLAY mode, this button has a different meaning. Please see Playback for the details.
The MODE button (see the figure below) is the middle one of the three buttons near the bottom on the back panel.
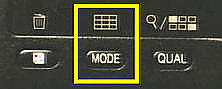
The MODE button (see the figure below) is used in the M-REC mode for setting exposure mode: P for program mode which is the default, A for aperture-priority mode, and S for shutter-priority mode.
To choose an exposure mode, first set the mode dial to M-REC. Then, hold the MODE button and at the same time turn the command dial. The lower-left corner of the LCD monitor and control panel will display P for the program mode, A for the aperture-priority mode, and S for the shutter-priority mode.
In the PLAY mode, the MODE button plays a very different role. Press this button in the PLAY to change the LCD monitor display mode from one big photograph to nine smaller photographs, and vice versa. Please see Playback for the details.
The Exposure Compensation Button +/-
The +/- button (see the figure below) is the left-most one of the three buttons near the bottom on the back panel.
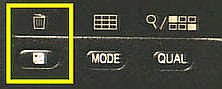
By default, there is no exposure compensation. But, this compensation value can be changed in 1/3-stop increment or decrement. In the A-REC mode and M-REC mode, hold button +/- and at the same time turn the command dial changes the exposure compensation value. Turning the command dial to the right increases exposure by 0.3-stop. Actual increments are 0.3, 0.7, 1.0, 1.3, 1.7 and 2.0. Turning the command dial to the left decreases exposure by -0.3-stop. Actual decrements are -0.3, -0.7, -1.0, -1.3, -1.7 and -2.0. Please see Exposure Compensation for the details.
In the PLAY mode, button +/- is used for deleting a photograph. Please see Playback for the details.
![]()
The command dial locates below the mode dial and shutter release button, and above the handgrip. See the figure below.
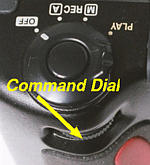
The command dial can be turned in both directions. Normally, it is used with other buttons such as the image quality button QUAL for selecting an image quality, the mode button MODE for selecting an exposure mode, and the +/- button for exposure compensation.