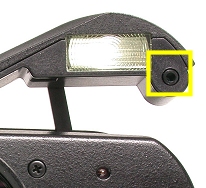
The TTL (i.e., Through The Lens) mode means that the camera will measure the output of the external flash and stop the flash once illumination is sufficient. This is the easiest mode of using external flashes. However, do keep in mind that the Coolpix 4500 does not perform true TTL flash metering. It measures flash illumination with a flash sensor below the flash tube. See the image below. As a result, to use an external flash, the internal flash must be raised even though the internal flash is turned off.
The external flash can be used in all modes; however, in the Auto mode and Scene mode, one cannot turn on or off the external flash. More precisely, both the internal and external flashes will be on even if the external flash is turned off in other modes. The camera will fire both if the scene illumination is insufficient.
External flashes can be used in the Program Mode (P), the Aperture-Priority Mode (A), the Shutter-Priority Mode (S) and the Manual Exposure Mode (M). In the Program mode (P), one simply point and shoot. It is similar to the use of the internal flash.
In the Aperture-Priority (A) mode, you select an aperture and the camera chooses an appropriate shutter speed. Because an external flash is being used, the camera will set the shutter speed to the flash synchronization speed (i.e., 1/60 or 125 sec). When you press the shutter-release button, the flash fires. The flash sensor measures the illumination and stops the flash when the illumination under the given aperture is sufficient. There are two extreme cases. One, if the flash illumination is not enough, the camera will force the flash to put out more power until the illumination is right. However, it is possible that the external flash being used does not have the needed power (i.e., GN is not large enough). If this happens, your image will be under-exposed, and you need to use a larger aperture. Two, if the flash illumination is more than necessary, the camera will force the external flash to cut down its power. However, it is possible that the power of the external flash has already reached its lowest power level and cannot be reduced further. In this case, your image will be over-exposed due to too much flash illumination and you should consider to use a smaller aperture or move your external flash away from the subjects.
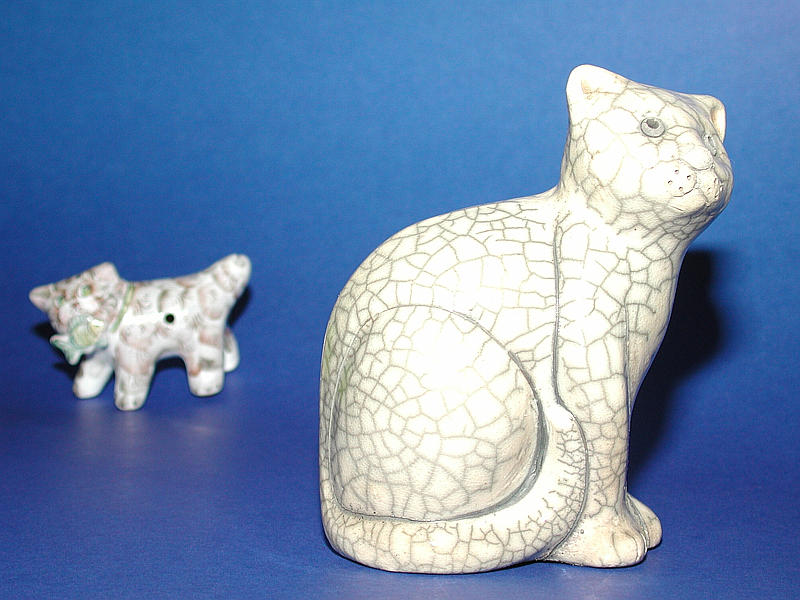
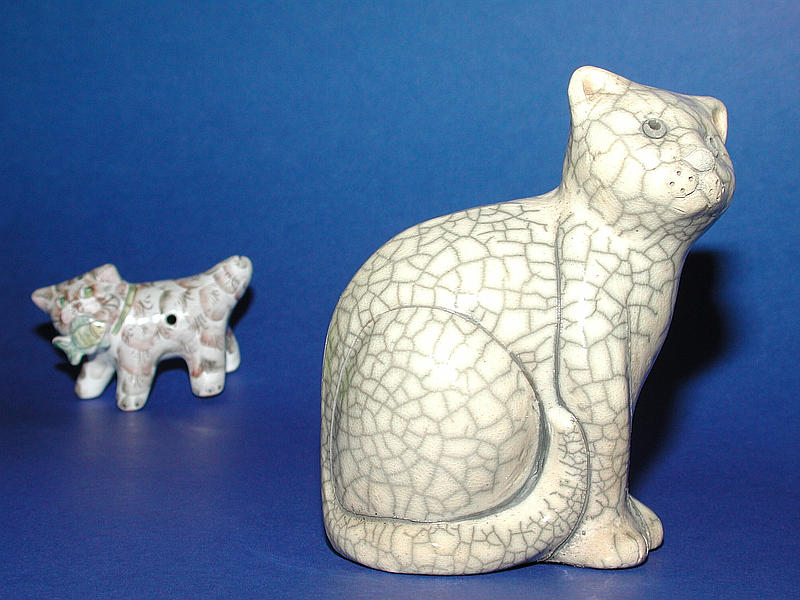
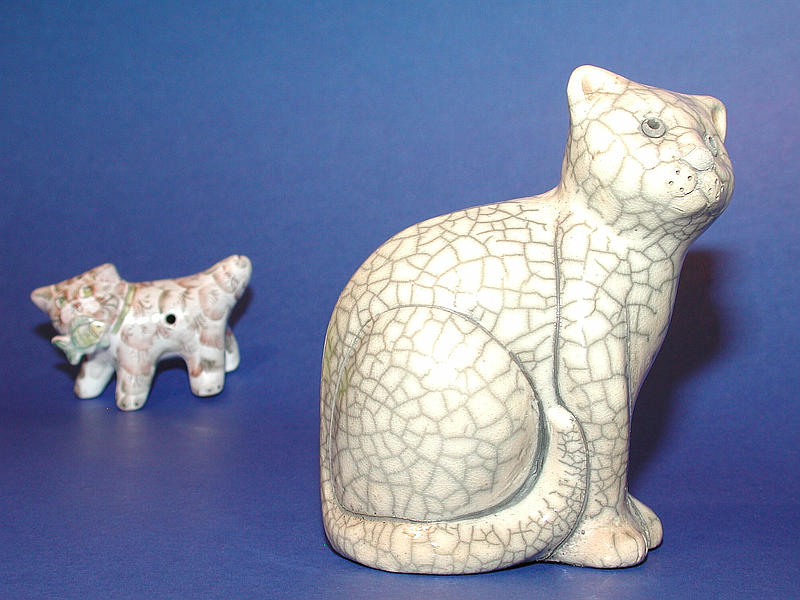
To illustrate this TTL working style, let us take a look at the following five images. They were taken under the synchronization shutter speed with apertures F9.8, F7.8, F6.2, F4.9 and F3.5. The smaller cat in the far end gives a feeling of depth of field. Note that the larger the aperture you use, the shallower depth of field you get. Thus, for small apertures such as F9.8 and F7.8, the smaller cat is quite sharp in the images. On the other hand, the smaller cat is out of focus in images taken with larger apertures (e.g., F4.9 and F3.5). If you compare these five images, you will find out that exposure in the images of F9.8, F7.8 and F6.2 are similar except that the depth of field levels are different. The image taken with F4.9 is slightly brighter than the images on the top row. This means it is slightly over-exposed. Check the texture on the larger cat and you will see the difference. The image taken with F3.5 is definitely over-exposed because the larger cat's texture is washed out. This is due to the fact that the camera cannot reduce the flash power further. As mentioned earlier, to overcome this problem, you can use a smaller aperture or move the external flash away from the subjects.

|

|

|
| F9.8 | F7.8 | F6.2 |

|
|
| F4.9 | F3.5 |
| Click on the image to see a larger one | |
In the Shutter-Priority (S) mode, you select a shutter speed and the camera chooses an aperture. But, how about the flash synchronization speed? Can we choose a shutter speed that is different from the flash synchronization speed? The answer is "yes" and "no." If your scene is mainly illuminated by the flash, it does not matter what shutter speed you use. The flash sends out its light in a duration that is much shorter than the highest shutter speed. Because the only light source is your flash, after a flash light burst, the scene will not be illuminated and, as a result, the image capturing device will not be able to pick up the remaining ambient illumination even though the shutter is still open. However, if the ambient illumination is strong, the image capturing device will pick up some extra ambient light after the flash burst. Hence, in addition to the properly illuminated subjects by the flash light, subjects may pick up a touch of the ambient light. This is exactly what slow synchronization means. However, if the ambient light is too strong, adding a flash light without further control will likely give you an over-exposed image.
The following images illustrate the use of different shutter speeds and the chosen apertures (by the camera). The shutter speeds used were 1/500, 1/60, 1/15, 1/2, 2 and 8 sec, and the aperture values selected by the camera were F4.9, F4.9, F4.9, F4.9, F6.9 and F9.8. As you can see, F4.9 are used with four different shutter speeds. Although 1/500 sec is 256-fold faster than 1/2 sec, the image taken with 1/2 sec and F4.9 is only slightly over-exposed and is not very different from the ones taken with 1/500 and F4.9. This is because the ambient light is not strong and the one taken with 1/2 and F4.9 can be viewed as a slow synchronized version of the other three. However, even though the apertures were closed down to F6.9 and F9.8, the last two images, especially the last one, are over-exposed. These images show that the camera is not very good at shooting flash illuminated images in the shutter-priority mode. Therefore, staying with aperture-priority node is a better idea.
|

|

|
| 1/500 sec F4.9 | 1/60 sec F4.9 | 1/15 sec F4.9 |
|

|

|
| 1/2 sec F4.9 | 2 sec F6.9 | 8 sec F9.8 |
| Click on the image to see a larger one | ||
The Variable Power feature also works for external flashes. As in the internal flash case, the output power of an external flash can be adjusted in the range of -2.0 stop and +2.0 stop with an increment of 1/3 stop.
The following images were taken using shutter speed 1/125 sec and aperture F7.0 in the aperture-priority mode. It is easy to see the impact of the flash output power on the brightness of the images. Therefore, variable power can serve as a way of doing exposure compensation for flashes. This can also be achieved using the output power ratio on an external flash; but, not all flashes have this capability.

|

|

|

|

|
| -2.0 stop | -1.0 stop | 0 stop | +1.0 stop | +2.0 stop |
| Click on the image to see a larger one | ||||
Just like the built-in meter of your camera, the flash sensor is also calibrated to measure the mid gray tone. As a result, light (resp., dark) color subjects are likely to be under- (resp., over-) exposed. To compensate, we need to increase or decrease the flash output power by reposition the flash or use an aperture different from that of the on-camera one.