After mounting the flash, turn it on and set the flash mode to TTL. The flash should not be set to the stand-by mode (i.e., STBY); otherwise, it may turn itself off unexpectedly. If it is possible, the flash zoom should be set to its widest setting (e.g., 28mm or 35mm).
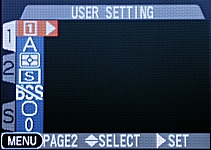
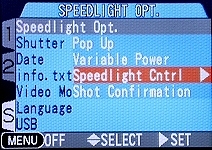
You have two choices. You can either allow both the external and internal flashes to fire at the same time. Or, you can use the auto mode in which the external flash always fire and the internal flash also fires if the external one does not provide sufficient illumination. To select one of these two options, follow the procedure below:

|

|
|
|
|
|
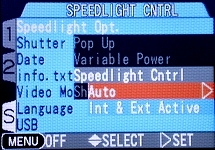
As mentioned earlier, option Int & Ext Active means the internal and external both fires, and option Auto means the internal flash will fire only if the external flash does not provide sufficient illumination. Use the up and down arrows to highlight the desired option and the right arrow to make a selection.
| Do not forget to raise the internal flash in order to use the external one. |
The answer is YES, and you do not even have to go through the above procedure! A number of shooting options turn off the internal flash automatically. Click here to see these options. If one of these options is in effect, the internal flash is popped up, and an external flash is mounted and is on, then only the external flash will fire and the internal flash is disabled. Whether you prefer this trick is up to your preference.
Similar to the internal flash, there are a number of different external flash modes available if Auto is selected. These options, which can be selected by pressing the FLASH button on the left side of the lens barrel, are shown in the tables below. These icons will be displayed in the upper right corner of the LCD monitor. The left and right icons indicate the flash mode of the external and internal flashes, respectively. Note that although the icon shows the internal flash is canceled. it will fire if the external flash does not provide sufficient illumination. If you choose one of the shooting modes that disables the internal flash, the icons displayed on the LCD monitor are exactly the same.
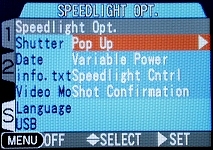
If the Pop Up menu is set to Auto, the possible external flash are shown below. However, if Pop Up is set to Manual, the first two modes will not appear because the photographer controls if flash is necessary by manually popping up the internal flash.
| LCD Icon | Meaning |

|
The Flash Cancel mode. Turn off the external flash. Since the internal flash is also off, no flash illumination is available. |

|
The Auto mode. When illumination is poor, the external flash fires automatically. |

|
The Red-Eye Reduction mode. However, the red-eye reduction is performed by the internal flash rather than by the external one. |

| The Fill Flash mode. Force the external flash to fire. This is useful for fill flash. |

|
The Slow Synchronization mode. Activates the Slow Synchronization capability of the external flash. |
If the selected option is Int & Ext Active, the available external flash modes are identical to those of the internal flash. Again, the actual available modes depend on if Pop Up is set to Auto or Manual. If the pop-up mode is Auto, the modes are auto flash (no icon), Flash Cancel, Fill Flash, Red-Eye Reduction and Slow Synchronization. If the pop-up mode is set to Manual, there are only three modes: Fill Flash, Red-Eye Reduction and Slow Synchronization. Note that there will be only one flash mode icon shown in the upper-right corner of the LCD monitor because the internal and external flashes both fire and use the same mode. Therefore, if you have an external flash mounted on the camera and you only see one flash icon in the upper right corner, then the flash is not turned on and/or the external flash option is set to Int & Ext Active.
The use of external flash in the user set A mode is very easy. You just mount an external flash and turn it on. The flash mode is selected by pressing the FLASH button on the left side of the lens barrel. No menu setting is needed. The available flash modes and their corresponding icons, which will appear in the upper right corner of the LCD monitor, are listed in the following table. As you can see from the table, the internal flash is turned off in all modes. Note that the internal flash pops up automatically when flash illumination is needed, although the internal flash does not fire.
| LCD Icon | Meaning |
|
|
The Flash Cancel mode. Turn off the external flash. Since the internal flash is also off, no flash illumination is available. |
|
|
The Auto mode. When illumination is poor, the external flash fires automatically. |
|
|
The Red-Eye Reduction mode. However, the red-eye reduction is performed by the internal flash rather than by the external one. |
|
| The Fill Flash mode. Force the external flash to fire. This is useful for fill flash. |
|
|
The Slow Synchronization mode. Activates the Slow Synchronization capability of the external flash. |