OBJECTIVE: Learn the various modalities for construction of sensors utilizing electrical and optical measurement techniques.
EXPERIMENT 1: ELECTRICAL IMPEDANCE BACKGROUND:
Many of the biomedical measurements are done by measuring "secondary" quantities instead of measuring the actual biological quantity of interest. For example, direct measurement of the left ventricular (LV) volume requires the removal and isolation of the heart, which is usually not possible. Measurement of electrical impedance of the blood volume contained within the heart can be done using a catheter with minimal disturbance to the cardiovascular function. This impedance is related to the ventricular volume and can be used to estimate the LV volume as well as other cardiovascular parameters such as ejection fraction. Impedance Plethysmography is one of the commonly used procedures for the measurement of the LV volume. It's principle is explained below:
Electrical resistance of a conductor is given by the following equation:
![]() [Equation 2.1]
[Equation 2.1]
where R is the resistance in W (ohms)
r
is the unit resistance in W -meters,L is the length of the conductor,
A is the cross sectional area of the conductor.
One can place two electrodes in tissue at a distance L from each other. Experimenter applies a small amount of current to these electrodes, say I. Since the tissue acts as a resistor, a voltage drop of V can be measured between the electrodes. Resistance of the tissue between the electrodes can be calculated using the Ohm's Law:
![]() [Equation 2.2]
[Equation 2.2]
Since we know r and L, we can calculate the cross sectional area, A, and the tissue volume = A L . Although this method is applicable to cylindrical shaped tissue, if the organ being measured does not conform to cylindrical shape, then some modifications to the method is needed. In the case of the left ventricle, we will measure the volume by approximating as multiple disks stacked on top of each other. Figure 2.1 below shows the concept drawing.
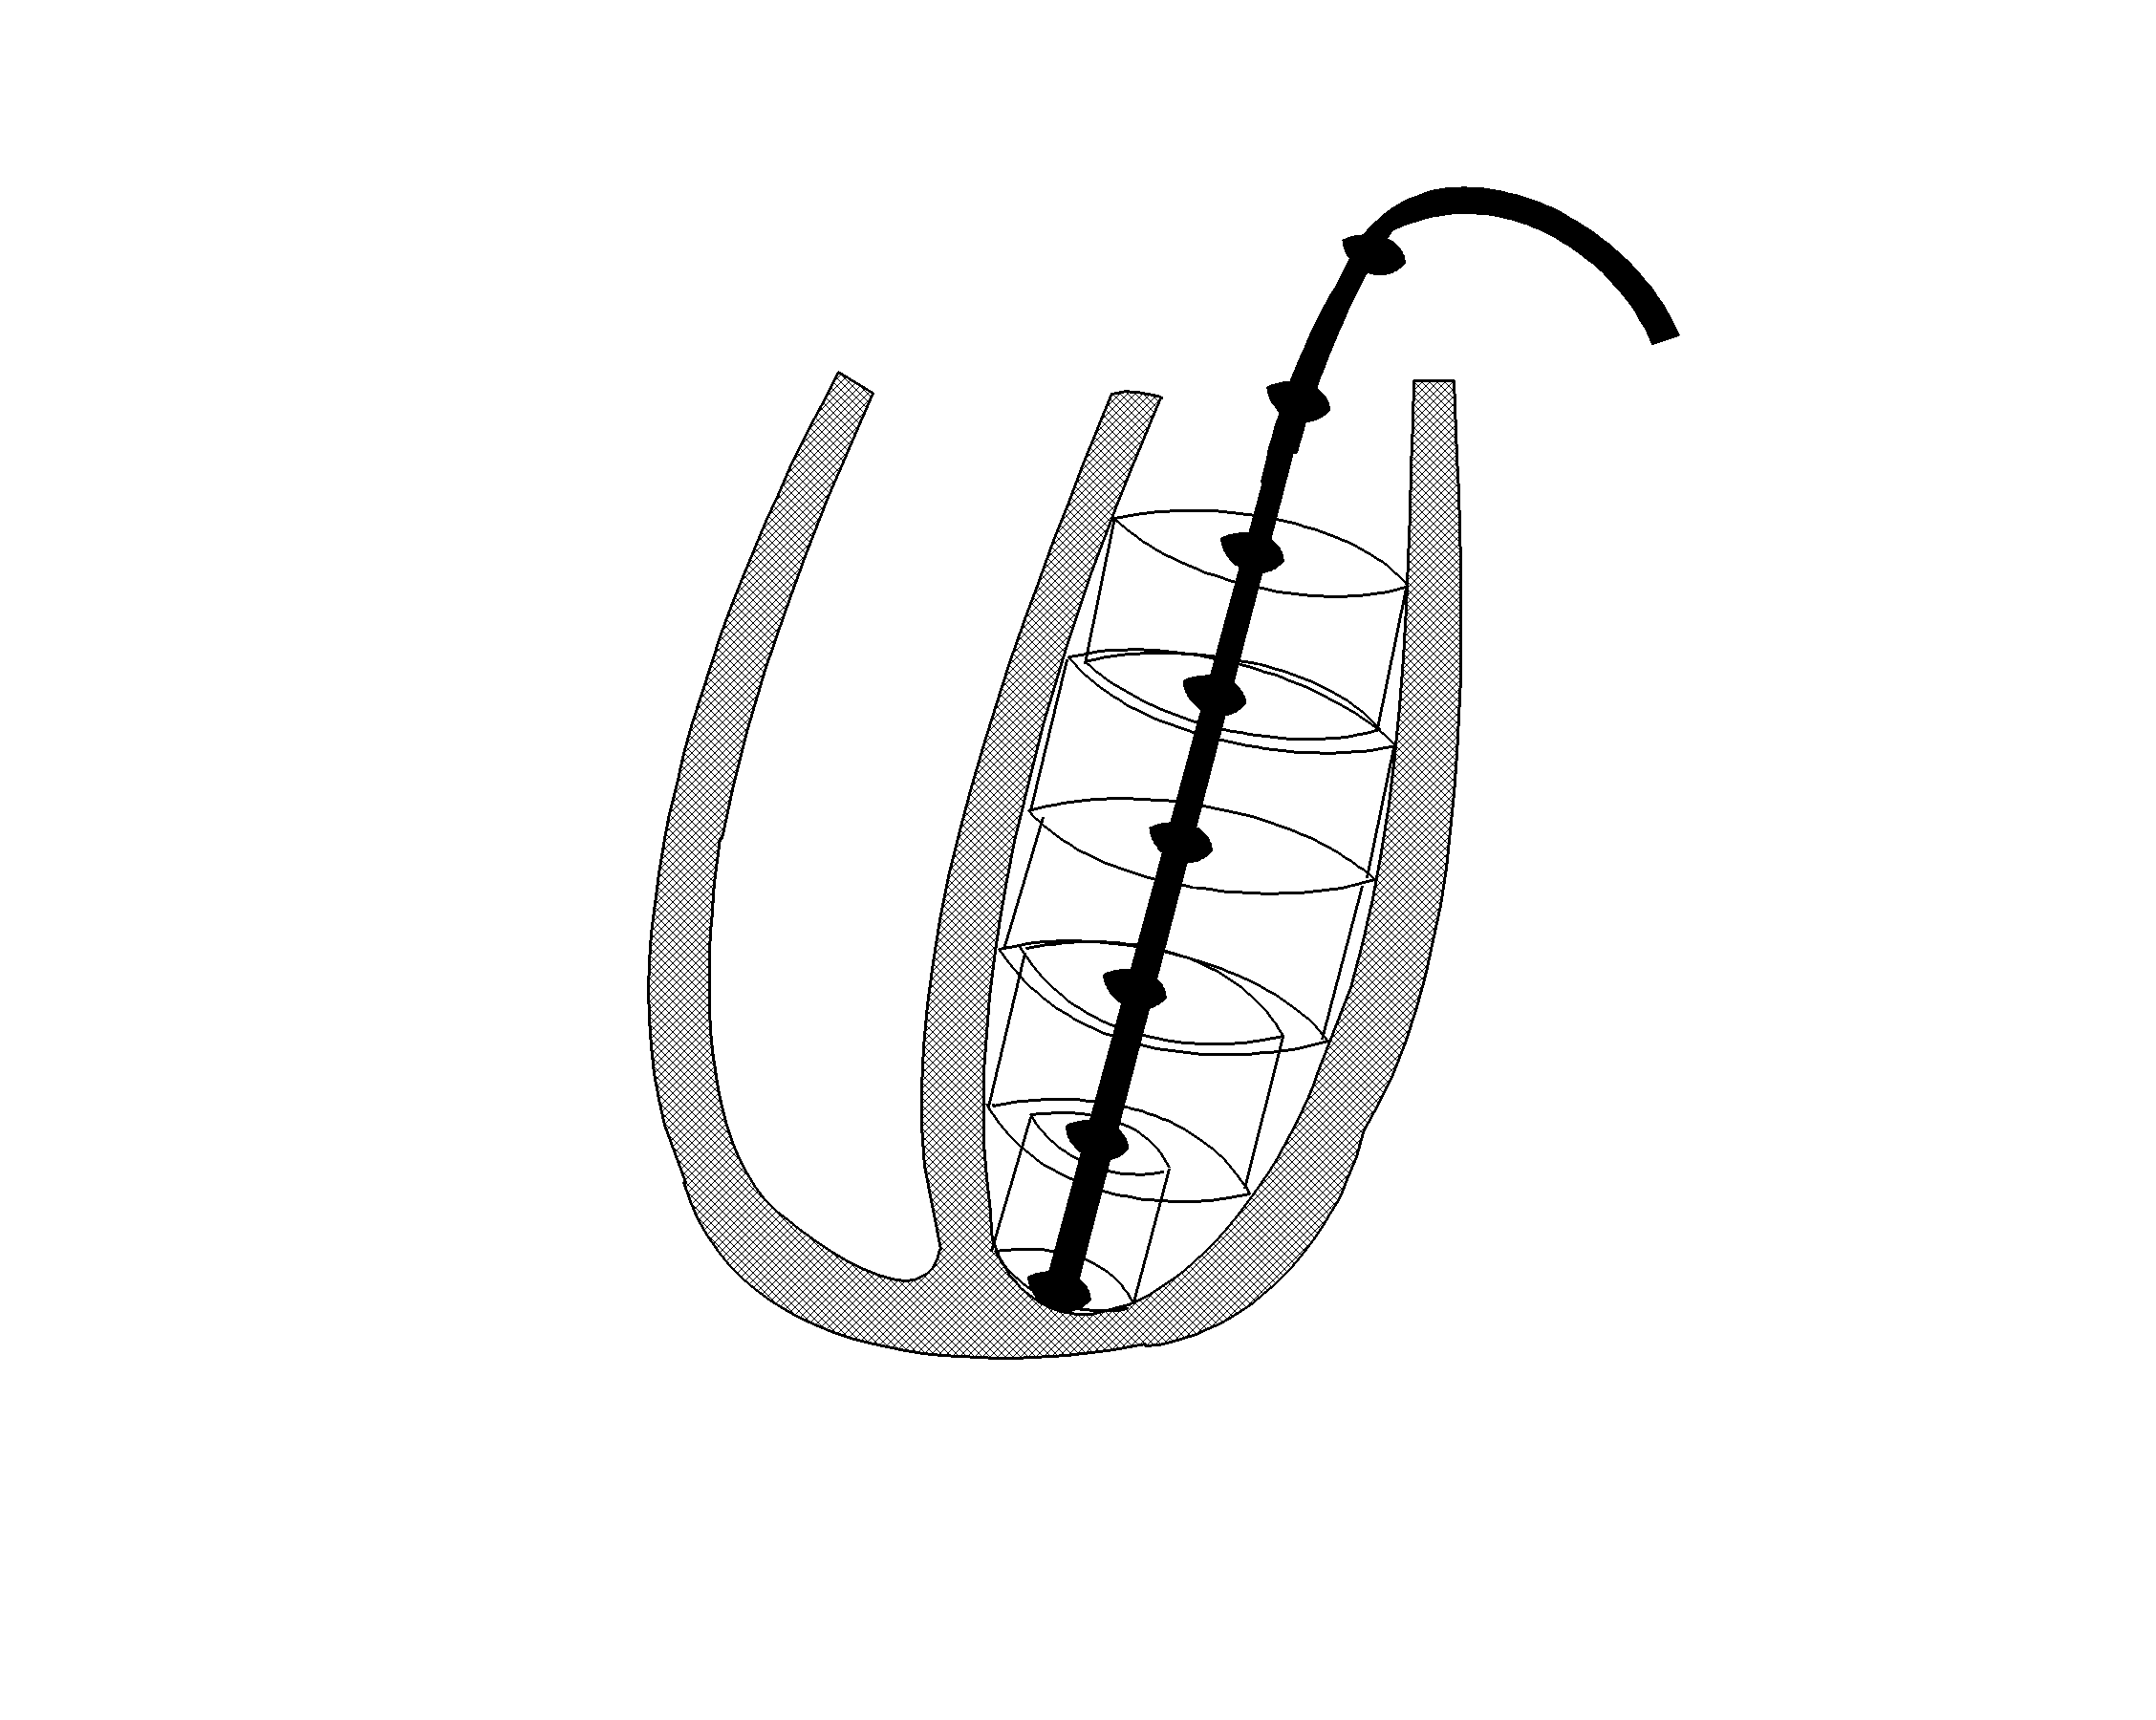
Figure 2.1. Measurement of Left Ventricular volume using impedance plethysmography.
Electrical current is applied between the most distal and the most proximal electrodes, i.e. one in the apex and the one in the aorta. Resistance of the disk between the electrodes i and j can be found as
![]() [Equation 2.3]
[Equation 2.3]
which can be used to calculate the area of the disks as
 [Equation 2.4]
Volume of the individual disks can be calculated as
![]() [Equation 2.5]
[Equation 2.5]
And the total volume of the left ventricle can be calculated as
![]() [Equation 2.6]
[Equation 2.6]
PROCEDURE 1: You will be provided with a resistor pack to simulate the LV intracardiac impedance.
REPORT SECTION 1:
EXPERIMENT 2: BACKGROUND ON ELECTRICAL CAPACITANCE:
Capacitive sensors are also used for biomedical measurements. In one application, engineers use a capacitive sensor to measure force. Electrical capacitance between two parallel plates is a function of the distance between the plates. If a compliant material is placed between these metal plates, application of a vertical force compresses the material and reduces the distance between the plates, increasing the capacitance. Parallel plate capacitor is a simple electrical device which is based on the physical principle as explained below:
Two conductive plates are placed in parallel to each other as shown in Figure 2.2 below.
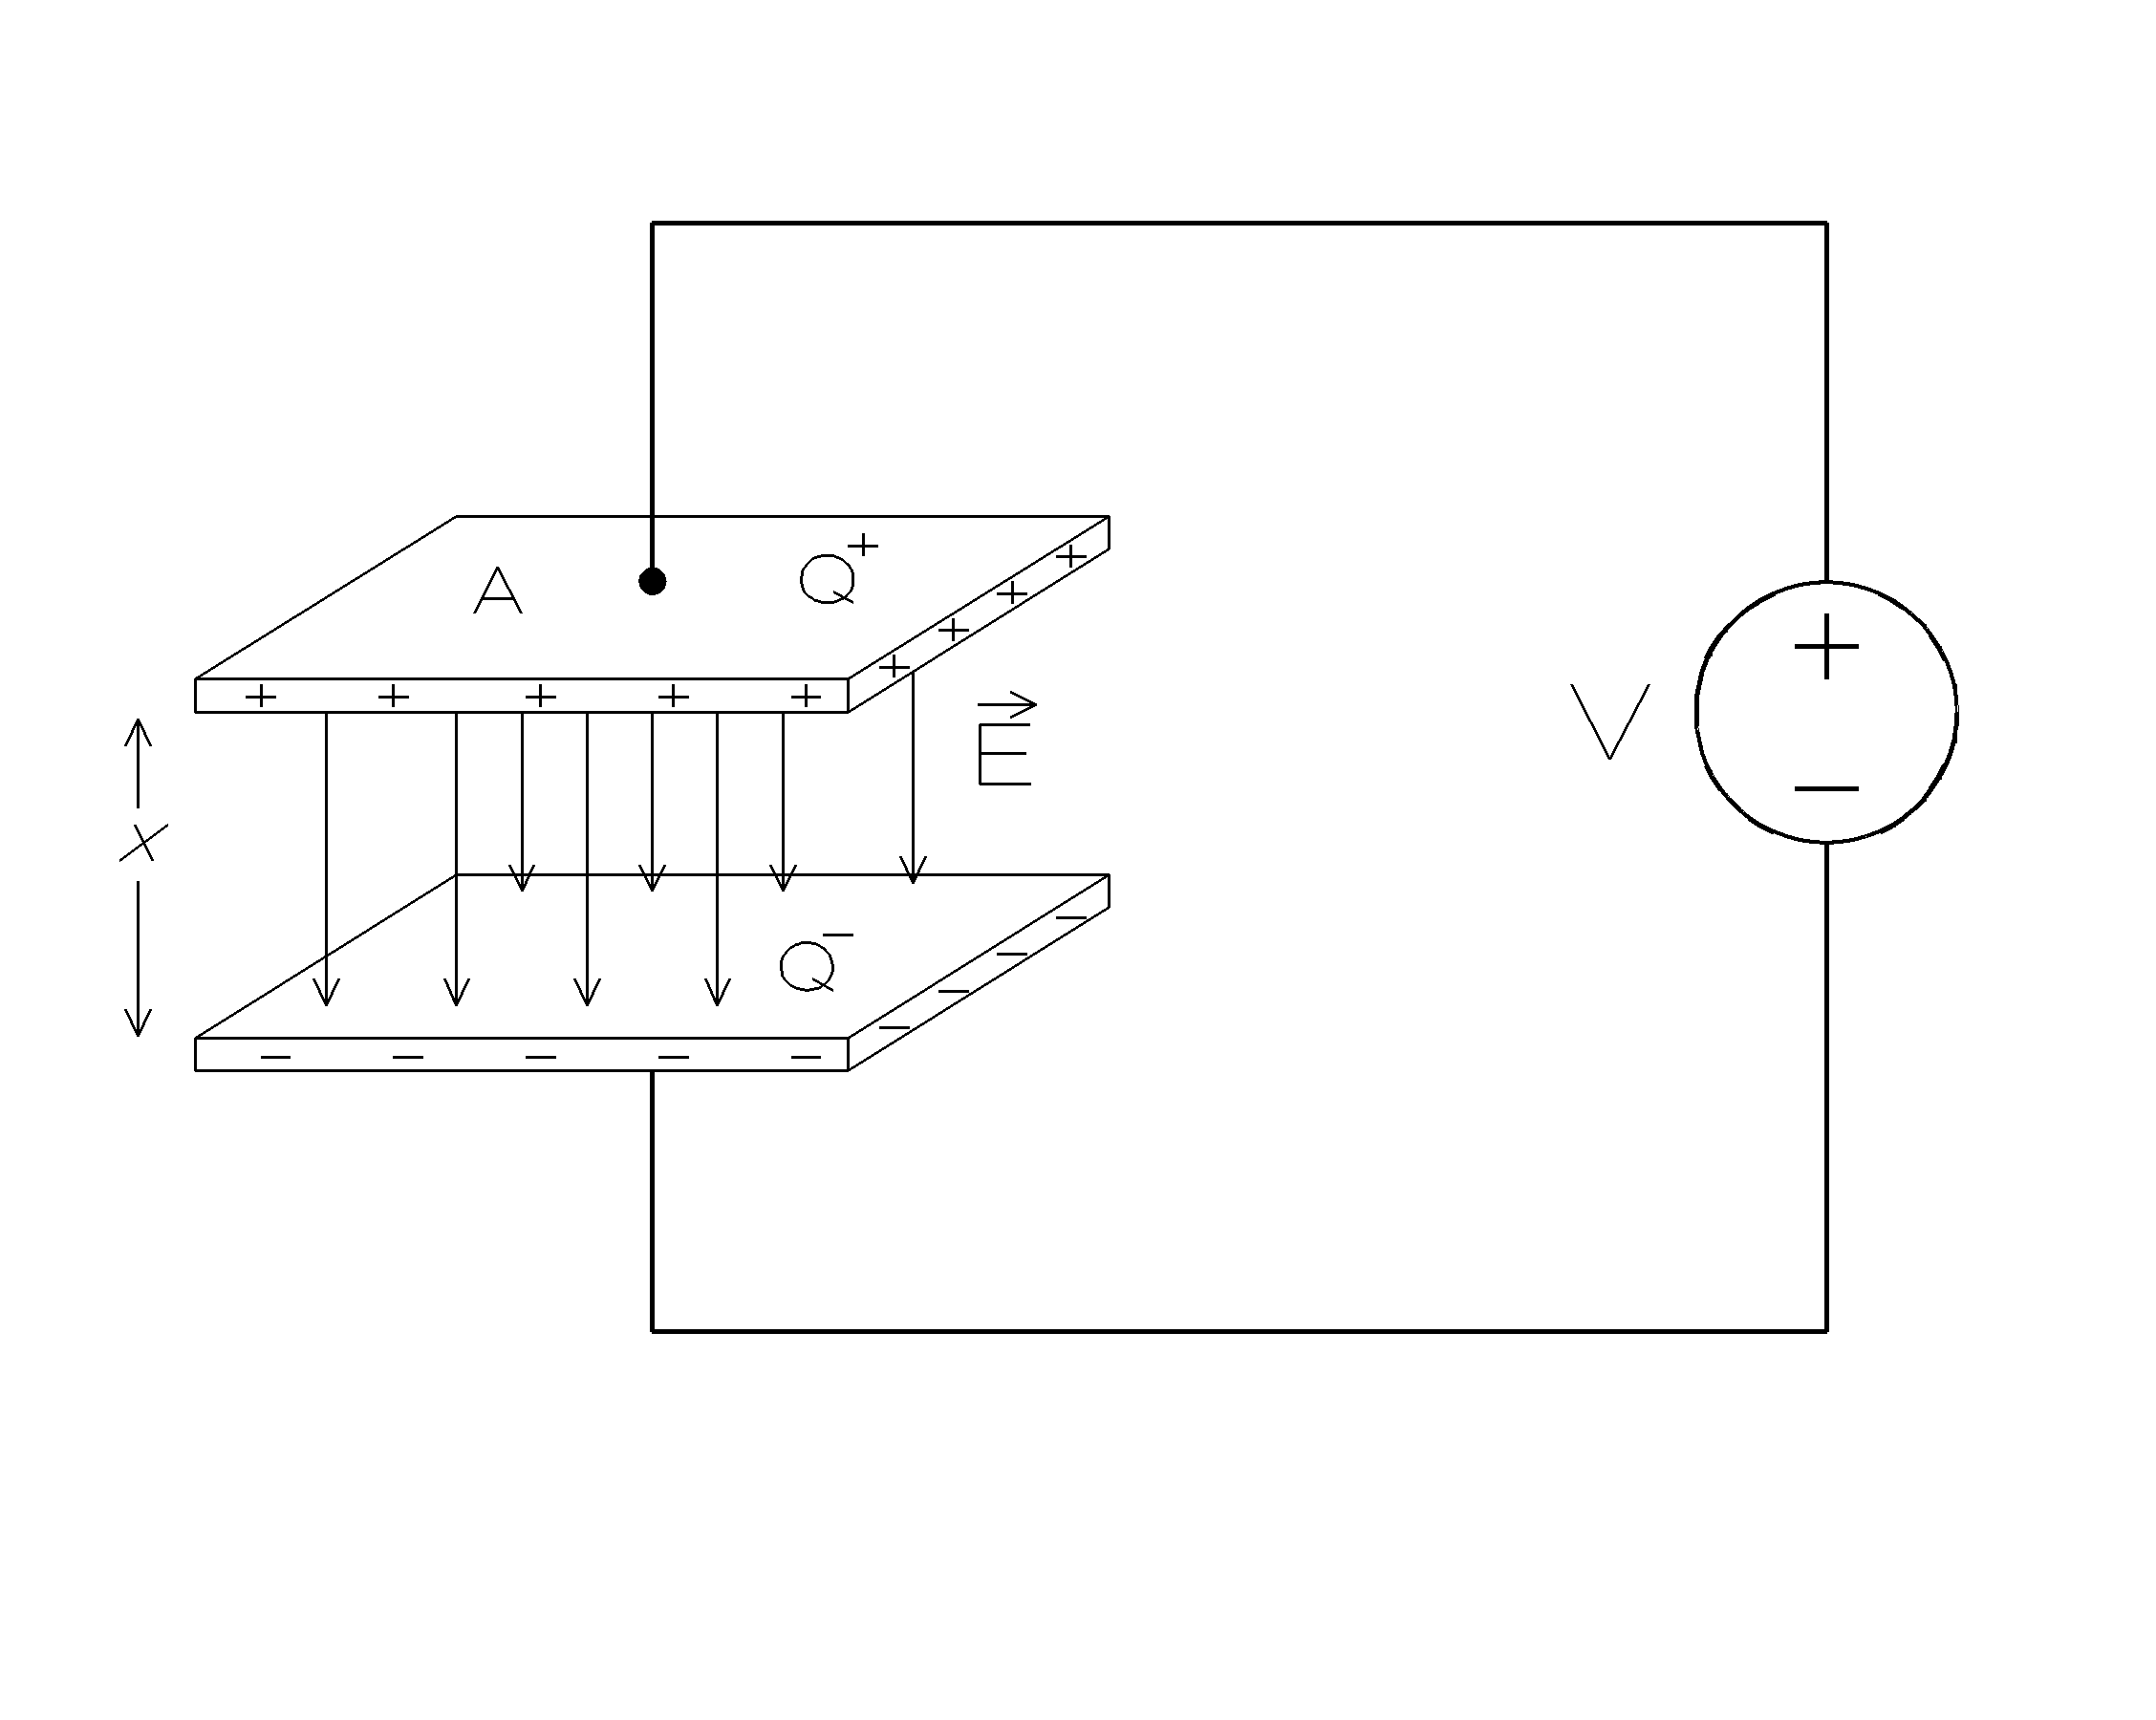
Figure 2.2. Parallel plate capacitor
Electric field E is defined as the electrostatic force seen by a unit charge, and given by the following equation:
![]() [Equation 2.7]
[Equation 2.7]
where E is the electric field vector,
F is the force seen by the change q within the electric field.
Electrical flux, F E is defined as the "flow" of electric field across a surface and is given by the following equation:
![]() [Equation 2.8]
[Equation 2.8]
where F E is the electrical flux,
E is the electric field vector,
ds is the vector normal to the surface.
Gauss' Law gives the relationship between F E over a surface enclosing a charge Q, and is given as stated below:
![]() [Equation 2.9]
[Equation 2.9]
where e 0 is the permittivity constant and given as e 0 = 8.85x10⁻¹² Farads/meter,
F
E is the electrical flux as given by the equation 2.8,Q is the electrical charge enclosed by the surface which forms the base of the integration in equation 2.8.
Substituting equations 2.8 in equation 2.9,
![]() [Equation 2.10]
[Equation 2.10]
If a closed surface was placed over the top plate shown in Figure 2.2, we can calculate the electric field between the two plates as follows:
![]() [Equation 2.11]
[Equation 2.11]
where A is the surface area of the parallel plate.
Solving for the electric field, E,
![]() [Equation 2.12]
[Equation 2.12]
Electrical voltage, V, is defined as the line integral of the electrical field, so,
![]() [Equation 2.13]
[Equation 2.13]
where V is the voltage between the two plates,
Q is the electrical charge on the plate,
x is the distance between the plates,
A is the surface area of the parallel plate,
e
0 is the permittivity constant and given as e 0 = 8.85x10⁻¹² Farads/meter.
Electrical capacitance is defined as electrical charge which can be stored for a given voltage. Then the capacitance,C, of the parallel plate capacitor can be found as follows:
![]() [Equation 2.14]
[Equation 2.14]
Note that the equation 2.14 for electrical capacitance is independent of the electrical charge on the plates as well as the voltage between the plates. It is very similar to the equation 2.1 where the electrical resistance does not depend on the voltage or the current.
When a force is applied to the parallel plate capacitor, distance between the plates changes, hence changing the capacitance.
PROCEDURE 2: You will build a capacitor and vary the distance between the plates to simulate application of pressure.
REPORT SECTION 2: