

Working with drawing canvas only allows you to create curves in the xy-plane. To design space curves, we need to work with the z-axis and use transformations that can applied to all three coordinate axes.
All previous discussions only show the curve on the xy-plane. The z-axis is the axis that is perpendicular to the xy-plane (i.e., the screen). To see the z-axis, space transformations are required. This system supports transformations (i.e., translations and rotations) applied to the whole scene or to a curve. Transformations applied to the scene will transform the coordinate axes as well as all curves. One might consider scene transformations equivalent to moving one's camera around. Transformations applied to a curve only translate or rotate the current curve, the curve selected for further editing. The coordinate axes remain unchanged.
Space transformations are performed using buttons and sliders in the bottom part of the drawing canvas as shown below:
Clicking on Curve and Scene selects the current curve and the scene to be translated or rotated, respectively. Clicking on Point only allows the selected control point be translated. The ID of the selected control point is shown in the Point button and the coordinate values and weight are shown in buttons X, Y, Z and W. The top slider is for translation and the bottom slider is for rotation.

This system has a virtual and invisible world coordinate system which is identical to the one shown on the drawing canvas when the scene is not translated and rotated. If your select Techniques followed by Show Coordinate Axes, you will see the coordinate axes. The horizontal one is the x-axis, the vertical one is the y-axis, and the one pointing at you is the z-axis.
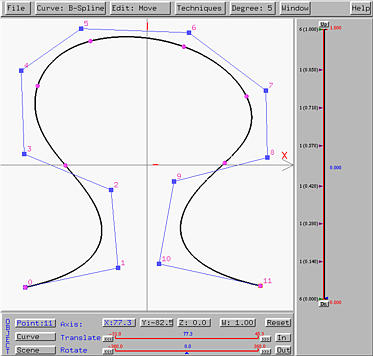
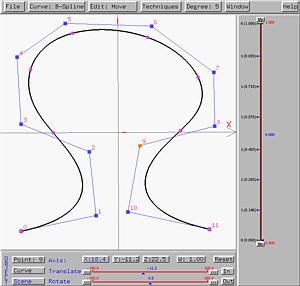
To translate or rotate the scene, we should first select what should be transformed (i.e., scene or curve), followed by a reference axis (i.e., x-, y- or z-axis), followed by moving the little triangles of the two sliders to generate the desired effects. The following is a B-spline curve of degree 5 defined by 12 control points:
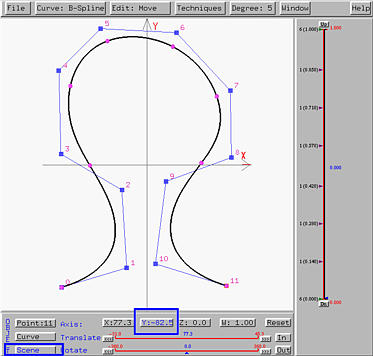
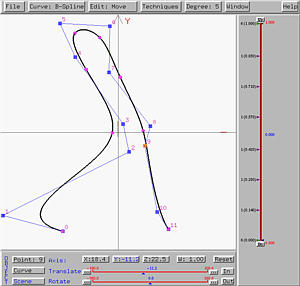
Now we want to rotate the scene about the y-axis. Clicking on the Scene button. It will be shown in blue color indicating that all subsequent transformations will be applied to the whole scene. To carry out rotation about the y-axis, click on button Y. Then, it is also shown in blue, indicating that all subsequent transformations will be performed with respect to the y-axis (i.e., translating in the y-axis direction and rotating about the y-axis). Finally, sliding the little triangle of the Rotate slider will rotate the scene about the y-axis, and sliding the the little triangle of the Translate slider will translate the scene parallel to the y-axis. The following figure shows the result of rotating the scene about the y-axis:
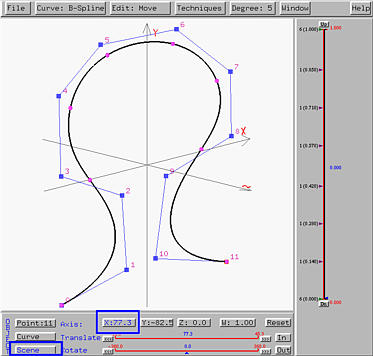
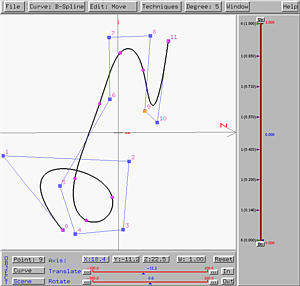
Next, let us rotate the scene about the x-axis. Please note that a scene rotation is always about one of the three virtual and invisible coordinate axes. The x-axis is the one parallel to your screen's horizontal edge, the y-axis is the one parallel to your screen's vertical edge, and the z-axis is perpendicular to your screen. These three virtual axes never change. In this way, you will have a world coordinate as an absolute reference. To rotate the scene about the x-axis, click on X would be sufficient because the button Scene is still active. The following shows the result of rotating the scene about the (virtual) x-axis. Now you can see all three coordinate axes and the position of the curve (in the xy-plane).
The following figure shows the xy-plane view of this curve, which looks exactly the same as the original planar curve since we did not move any control points in the xy-direction.
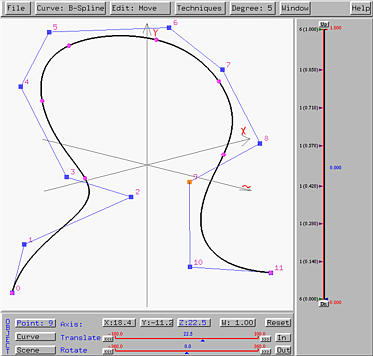
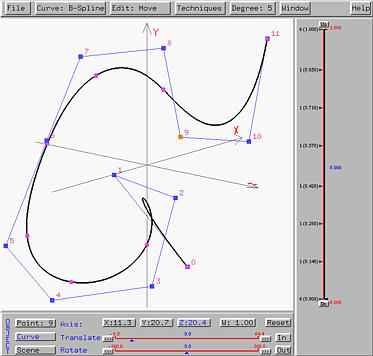
If we rotate the scene so that the x-axis is perpendicular to the screen, the result is the left figure below. It is obvious that now all control points have z-coordinate different from 0. The right figure below is the result of rotating the scene so that the y-axis is perpendicular to the screen.
Note that you can intermix scene and curve transformations to complete your design. However, at any time, a transformation can either be applied to the selected point, the current curve or the scene.