Surface Finish
Surface finish describes what the surface of a shape should look like.
Keyword finish {} has four options. None of
these options is required. The syntax is the
following:
finish {
phong p // phong highlight in [0,1]
ambient a // ambient factor in [0,1]
diffuse d // diffuse factor in [0,1]
reflection r // reflection factor in [0,1]
}
All factors shown above, p, a, d and r are real
values in the range of 0 and 1 inclusive. Their default values are shown below:
Keyword |
Minimum |
Maximum |
Default |
phong |
0 |
1 |
0 |
ambient |
0 |
1 |
0 |
diffuse |
0 |
1 |
0.6 |
reflection |
0 |
1 |
0 |
finish {} is used in a shape like pigment {}. For example,
the following torus has color SpicyPink, phong value of
0.6 and fully reflexive. After adding color and surface finish, this torus
is rotated about the x-axis 30 degree and then translated to
< 5, 6, 5 >.
torus {
5, 1
pigment { color SpicyPick }
finish {
phong 0.6
reflection 1.0
}
rotate 30*x
translate < 5, 6, 5 >
}
phong
phong is used to generate highlight spots. These highlights are
reflections of light sources. The larger the value for phong the
brighter the highlight. If the phong value is zero, which is the default
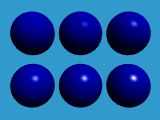
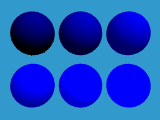
as shown above, there is no highlight. In the following figure, all spheres
are in color Blue. Spheres on the top row, from left to right, have
phong values 0, 0.2, and 0.4, while spheres on the bottom row have
phong values 0.6, 0.8 and 1.0.
ambient
ambient is used to specify how much ambient light can be reflected from
the surface of a shape. Note that this is different from reflexiveness, which
means the surface of a shape could reflect its neighboring shapes.
The ambient light is similar to the lighting in a foggy day. You don't
know where the light comes from, it is just there surrounding you.
In general, ambient light does not
play an important role in raytracing; but, it plays a good supporting
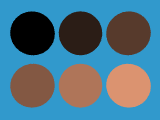
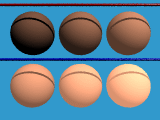
role. In the following figure, their diffuse values are all zero
(turn off diffuse light effect) and all spheres are of color Tan. The
ambient values are 0, 0.2 and 0.4 for the top row and 0.6, 0.8 and
1.0 for the bottom row. As you can see, all spheres look dull. When
ambient is zero, the sphere is back since it reflects no light
even though it has color Tan. Note also that no sphere details can be
seen.
diffuse
Unlike ambient, diffuse is the capability of reflecting directional
lights such as sun light and light from light sources. Thus, a higher
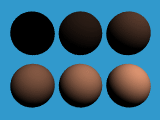
diffuse value makes the surface brighter. In the following
figure, all spheres are in color Tan with ambient values 0. Their
diffuse values are 0, 0.2 and 0.4 for the top row and 0.6, 0.8 and 1
for the bottom row. Note that the default diffuse value is 0.6.
As you can see from the figure, the spherical shape is more vivid when
the diffuse value is larger. The shapes would look dull if its
diffuse value is small.
reflection
reflection indicates the capability of reflecting the neighboring
environment. For a completely reflexive surface, its value is 1.
By default, no reflection is assumed. Note that adding reflection
into your shapes could dramatically increase its tracing time. In the
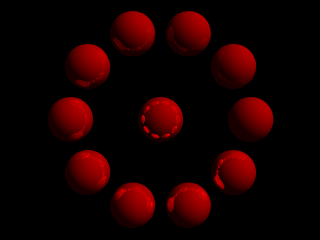
figure, starting with the right-most sphere with a reflection value
0, the other spheres have reflection values 0.1, 0.2, ..., 0.9.
The center sphere has a reflection value 1.0 (fully reflexive).
From this figure, you should be able to see the impact of larger and
smaller reflection values.
refraction and ior
When light ray enters a transparent surface, its path is bent. This bending
effect is refraction and how much each light ray is bent is specified
by the IOR, index of refraction.
To use refraction, we must make the object transparent. This is done with
fourth component of the color keyword. Instead of using
rgb, we can use rgbf, where f means filter. The value of
the fourth, filter, component is in the range of 0 and 1, with 0 being
non-transparent which is the default and 1 being completely transparent.
The following defines a half-transparent blue color.
color rgbf< 1, 0, 0, 0.5 >
If a color name is used, we can add the filter keyword followed by its
value. The following defines a 70% transparent navy-blue color.
color NavyBlue filter 0.7
There are two ways to specify refraction and IOR. In pre-version 3.0,
we use two keywords: refraction and ior. Keyword
refraction specifies the amount of refracted light, which is a real
number in the range of 0 and 1. However, due to a bug in versions 1 and 2
that may darken the surface of an object which is not a realistic effect,
the use of 1 is highly recommended. The index of refraction keyword
ior also requires a real value. Commonly used IOR values are given
in the table below. Of course, you can use any value!
Material
|
Air
|
Water
|
Crown Glass
|
Flint Glass
|
Diamond
|
IOR
|
1.000292
|
1.33
|
1.51
|
1.71
|
2.47
|
In pre-version 3.0, refraction and ior appear in finish.
The following defines a 100% transparent and refractive torus of white color
with IOR 1.51 (i.e., water).
torus {
0.625, 0.375
pigment { color White filter 1 }
finish {
phong 1
refraction 1.0
ior 1.51
}
}
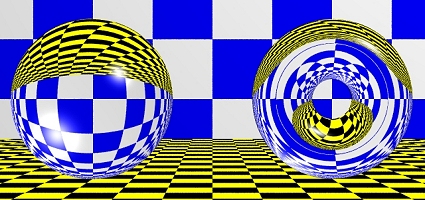
The follow image contains a sphere (IOR 1.33, water) and a torus
(IOR 1.51, crown glass). They are 100% transparent (i.e., filter
being 1). Due to refraction (i.e., light bending),
the ground texture (i.e., checker) can be seen on the
top part of both objects.
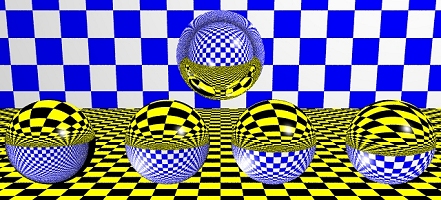
The following image illustrates the effect of IOR. The four spheres, from
right to left, have IOR's 1.33 (water), 1.51 (crown glass), 1.71 (flint glass)
and 2.47 (diamond). Thus, a higher IOR makes us to see "more" through
refraction. The sphere in the top has a "weird" IOR 0.75, which means incoming
light ray is un-bent! The produced effect is different.
If compatibility is not a problem, we can use interior as follows:
torus {
0.625, 0.375
pigment { color White filter 1 }
finish { phong 1 }
interior { ior 1.51 }
}
Some Useful Notes
Here are some useful notes for using surface finish keywords.
- The sum of ambient, diffuse and reflection
should not be greater than 1. If the sum is greater than 1,
"washed-out" effect will occur. In the following figure,
all spheres have a default diffuse value 0.6. From the top
row, the ambient values are 0, 0.2, 0.4, 0.6, 0.8 and 1.0.
All three spheres on the bottom row have a sum of ambient
and diffuse greater than 1 and as a result washed-out effect
occurs.
- This washed-out effect will also make shadows to disappear.
In the following figure, all spheres have a default diffuse
value. Their ambient values from top to bottom are 0, 0.2,
0.4, 0.6, 0.8 and 1.0. As the ambient values getting
larger, the washed-out effect is getting worse. Moreover, the
shadow color is getting lighter.
- The default values usually work fine. But, adding a little
ambient could help to make the dark area not so dark.
Please compare the dark area of the spheres on the top row.