The Control Panel Window

The Control Panel Window is activated by selecting
Windows followed by
Show Control Panel. Its purpose is
for changing the color scheme of a number of important objects.
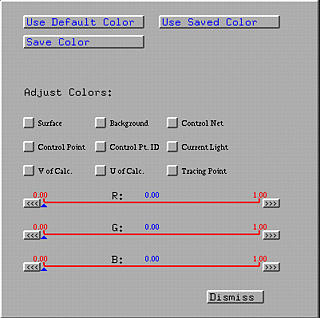
The three sliders are for selecting a color combination. The selected
color is show on the drawing canvas on-the-fly.
Click one of the nine buttons to change its color:
- Surface: Click this button
to change the surface color of the current surface.
- Background: Click this button
to change the background color of the drawing canvas.
- Control Net: Click this button
to change the color of the control net of the current surface.
- Control Point: Click this
button to change the color of the control points of the current
surface.
- Control Pt ID: Click this
button to change the color of the control point IDs of the
current surface.
- V of Calc.: Click this button
to change the v-direction color of the de Casteljau's or
de Boor's control net of the current surface.
- U of Calc.: Click this button
to change the u-direction color of the de Casteljau's or
de Boor's control net of the current surface.
- Tracing Pt: Click this button
to change the color of the tracing point of the current surface.
- Current Light: Click this
button to change the color of the current light. To select a
current light, select Lights,
followed by Set Current Light,
followed by one of the four light sources.
Note that the change of color scheme only affects this session. To use it in
the next session, the color scheme must be saved. You can click on
Save Color or use
File, followed by
Save, followed by
Save Color Scheme. Both methods will
generate a resource file in your current direction with filename
surface.rc. When the surface is
started next time, it will search for file
surface.rc and use the color scheme
described there. If this file is not found, the surface system will use
the default color scheme.
In case you want to use the default (resp., saved) color scheme,
click Use Default Color
(resp., Use Saved Color).