The 2500 is always in the auto focus mode, which means the camera will focus for you all the time. When the shutter-release button is half-way pressed, the camera starts the auto-focus process. If the camera successfully locks on the subject, the AF indicator shows up as shown below. Otherwise, the AF indicator blinks.
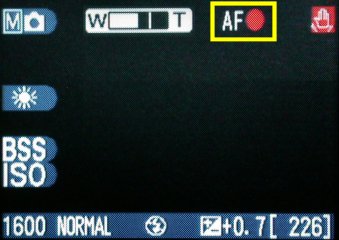
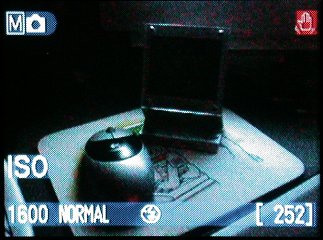
In addition to auto focus, the camera also determines a proper aperture and shutter speed to use. If the selected shutter speed is too slow, a red hand icon appears and blinks in the upper-right corner of the LCD monitor as shown above. This means you have to hold your camera very firmly or use a monopod/tripod. Otherwise, camera shake may blur the image, making it not very sharp or even worthless. When lighting condition is poor, three things are important. First, image on the LCD monitor may be "grainy." See the image below. This is fine and will not affect the captured image. Second, auto focus may fail. In this case, the AF indicator will keep blinking. Third, the flash indicator next to the FLASH button will be on (if the internal flash is set to the auto mode), indicating that the internal flash will fire when the shutter-release button is pressed all the way down to take a photo.
The auto-focus system always locks on the subject that is closest to the camera. The meaning of "closest" has to be clarified. In many cases, the camera may miss the "closest" subjects. Why? Simple. Whether the closest subject will be in focus depends on its "influence" to the autofocus system. It is also possible that the closest subjects are too close to the camera to be properly focused (i.e., shorter than the closest focusing distance). Let us take a look at an example. The scene has two boxes. The front and rear boxes are 9in and 3.5ft, respectively, from the camera. If the front box covers most of the scene as shown in the left image below, the camera correctly locks on the front box. If the front box covers about half of the scene, the camera locks on the front box as shown in the middle image below. Now, if we reduce the coverage to about 1/3, the camera locks on the rear box (right image below). From these images we learn that as long as the foreground subjects are not dominating the scene, the camera will likely focus on the farther away subject. However, it is very difficult to define the precise meaning of "dominating." Maybe the images below could give you a general feeling.

|

|
|
Therefore, if your scene contains a significant portion of foreground, or you intentionally put some foreground in the scene, the camera may focus on the wrong subject, and the foreground may be sharply focused and your main subjects may be out-of-focus. To overcome this problem, use the following focusing procedure:
Note that this foreground-main subject focusing problem only becomes very significant when the foreground is very close to the camera and the main subject is farther away (i.e., a big flower is very close to the camera with the main subject - a person or a building - is yards away). In general, if both the foreground and main subjects are close to each other and at a distance, this foreground-main subject issue is not a major problem.
Auto focus capable cameras usually fail if you aim them at the following subjects:
|
|
| Blurred subject | Subject in focus |
| Click on the image to see a larger one | |
If the lighting condition is poor, the 2500 may not be able to focus and you will see a blinking AF indicator. Unfortunately, the 2500 has no low light focusing assistance mechanism. One might point the camera to a brighter spot in order to focus. However, because the camera will auto focus and calculate exposure at the same time, pointing the camera to a brighter spot to focus will cause the camera to calculate exposure using the bright spot. Consequently, the captured image may not be well-exposed if the internal flash is not used. This problem has been bothering many Nikon users for years. There are some interesting remedies. One of the simplest is the use of a laser pointer. Laser pointers that can generate a line segment or an arrow would be the best. Point the laser pointer to your subject (not to the eyes, please) and make sure the line segment or arrow is vertical or in 45 degree angle on the LCD monitor, focus on the line segment or arrow, and take a shot. Note that the line segment or arrow does not have to be at the center of the image. I found out that this usually works even in a completely dark room.