The 2500 has two zoom modes. The optical zoom is performed by the camera lens, while the digital zoom is performed by the in-camera software. We shall discuss them in separate sections.
The 2500 has a zoom lens with focal length ranging from 5.6mm (the short end) to 16.8mm (the long end). This is a 3X zoom lens because of 3 = 16.8mm/5.6mm. In the traditional 35mm film camera's scale, it is equivalent to 37mm and 111mm. The 37mm end is slightly wider than the so-called normal lens (i.e., 50mm) and the long end 111mm is moderate telephoto. The following images show the difference at both ends:
|
|
|
| The wide end @ 37mm | The tele end @ 111mm |
This range covers most frequently used focal lengths. However, it may not be wide enough for scenic shots and it may not be long enough for extracting a portion of a scene in long distance. Unfortunately, Nikon does not manufacture any converter for the 2500. In fact, 2500's lens is not threaded for mounting any lens accessories. However, this does not mean one cannot use lens accessories. For the use of polarizers, click here, while for the use of converter lens and even scopes, click here.
The use of this zoom lens is very easy. Press the zoom button W to zoom out (i.e., to the wide end) and press the zoom button T to zoom in (i.e., to the tele end). See the left image below for the zoom buttons. When one of the two zoom buttons is pressed, a scale appears on the LCD monitor (below right). This scale has a vertical line at a distance about one-third from its right end. When you press the W (resp., T) zoom button, the white scale moves to the left (resp., right), indicating the current focal length. Naturally, the left end of the scale corresponds to 37mm, while the vertical line corresponds to 111mm. If the scale moves to the right beyond this vertical line, the camera enters the digital zoom mode. We shall discuss this feature later.

|

|
The following is an example. We start the zoom by pressing the zoom button W so that the scale moves to the left end. The image taken is the left one below. Then, press the T button until the scale is in the middle and take an image. The result is the middle one below. While the focal length may not change in a linear way, the middle of the scale is approximately 74mm = (37+111)/2. The yellow frame in the left image below shows approximately the location and size of the 74mm image within the 37mm image. Therefore, the covered area by the 74mm focal length is approximately a quarter of that of the 37mm image. Now, let us zoom all the way in so that the left half of the scale is filled completely. This pushes the zoom lens to 111mm and the resulting image is the right one below. The red (resp., yellow) frame in the 37mm (resp., 74mm) image indicates approximately the area covered by the 111mm focal length in the 37mm (resp., 74mm) image.
|
|
|
| The wide end @ 37mm | Moderate tele @ approx. 74mm | The tele end @ 111mm |
After the use of this zoom lens for a while, you will perhaps notice some lens distortion. There are in general two types of lens distortions, namely: barrel distortion and pincushion distortion. With the barrel distortion, straight lines become curves. This becomes more serious when the straight lines are closer to the edge. In the left image below, the window frame becomes convex (i.e., curved outward), a typical barrel distortion. Barrel distortion usually occurs in the wide angle end of a zoom lens. On the other hand, with pincushion distortion, straight lines become concave (i.e., curved inward). The right image below is a typical example of pincushion distortion. It is not very visible in small images because in this case pincushion distortion is not significant. Refer to the larger image for a better look. Pincushion distortion usually occurs in the tele end of a zoom lens.

|

|
| Barrel Distortion | Pincushion Distortion |
| Click on the image to see a larger one | |
Keep in mind that lens distortion is a universal problem of all lenses and is not unique to 2500's zoom lens. Better corrected lenses, of course, cost more than what we pay for a 2500. As a result, we should learn to avoid the impact of lens distortions. For example, both distortions would be very visible if there are straight lines near the edge of an image.
The meaning of perspective is difficult to be defined precisely without using technical terms. Because the image of a three-dimensional scene is two-dimensional, perspective is created by the relative size of similar objects (i.e., a distant object looks smaller than a nearby similar object), converging lines, and so on. Normally, we use telephoto lenses to take images of distant subjects so that the desired portion of the scene is ``extracted'' from its surrounding environment. The distance between two objects looks shorter and hence the scene seems "compressed" (i.e., objects look like close to each other). On the other hand, wide angle lenses are normally used to take a wide area and "exaggerate" the nearby objects (i.e., they look like larger than their actual sizes).
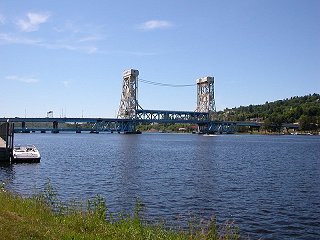
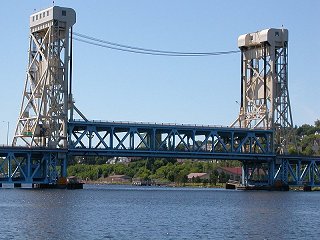
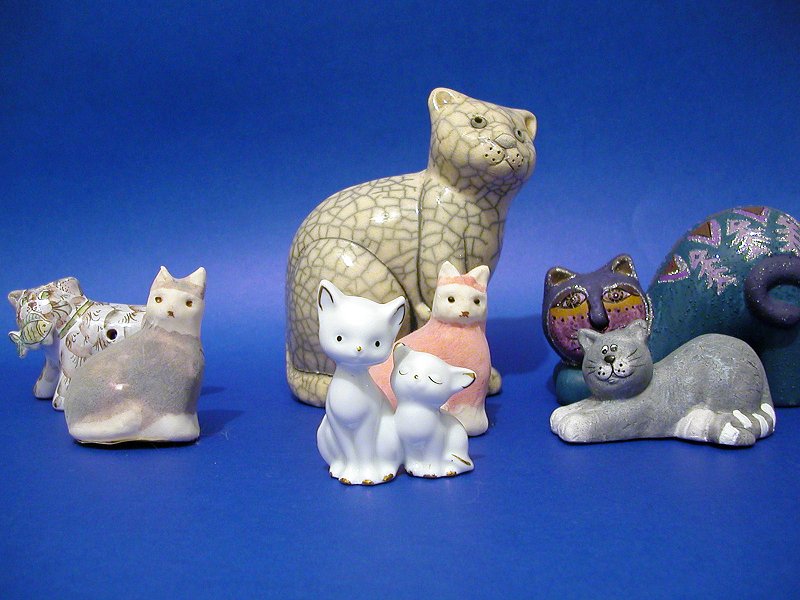
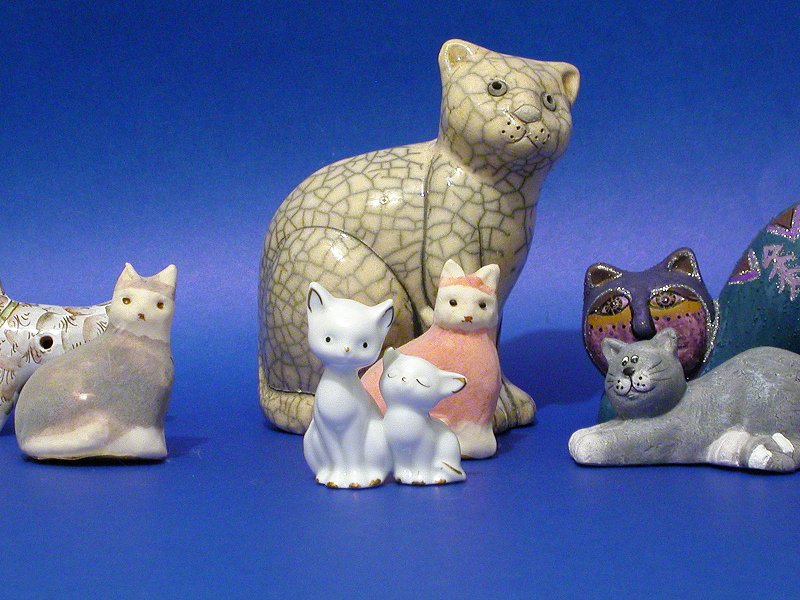
The following images show this effect. Two images of the same scene were taken by keeping the size of the white cats the same in both image. The left image below was taken using the wide angle end (i.e., 37mm), and the right one was taken using the telephoto end (i.e., 111mm). It is quite clear that the wide angle version covers a wider area even though the size of the main subject is kept the same. Additionally, each of the other subject looks smaller and the space between front and rear subjects looks wider. On the other hand, the telephoto version covers a smaller area and front and rear subjects look closer (i.e. the compression effect).
|
|
| Wide Angle @ 37mm | Telephoto @ 111mm |
| Click on the image to see a larger one | |
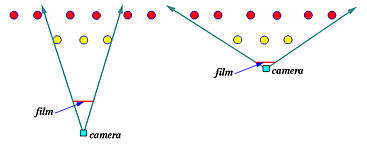
What is the cause of this perspective difference? Take a look at the following diagram. Suppose we wish to take a photo of the three yellow dots so that they will fill the whole frame. Because the view angle of a telephoto lens is narrow (below left), we must step back some distance to have all three yellow dots in the image, and, as a result, we could only cover about four red dots in the background into the image. On the other hand, a wide angle lens has a wider view angle. We can move closer to the subject (below right), and, consequently, the image will include six red dots. Since the telephoto image contains fewer subjects, each of the subject will have a larger size and, hence, give us an illusion that they are close to each other.
With this comparison in mind, if you want to exaggerate the foreground, consider the use of the wide angle end. In general, we point the lens a little downward so that the foreground will occupy a larger portion of the image. Of course, the foreground must have something interesting to be exaggerated. If you want to have a compressed effect that pulls distant objects close together, use a telephoto lens. Keep in mind that this does not rule out the common sense that using wide angle (resp., telephoto) to take a wide scene (resp., distant objects).
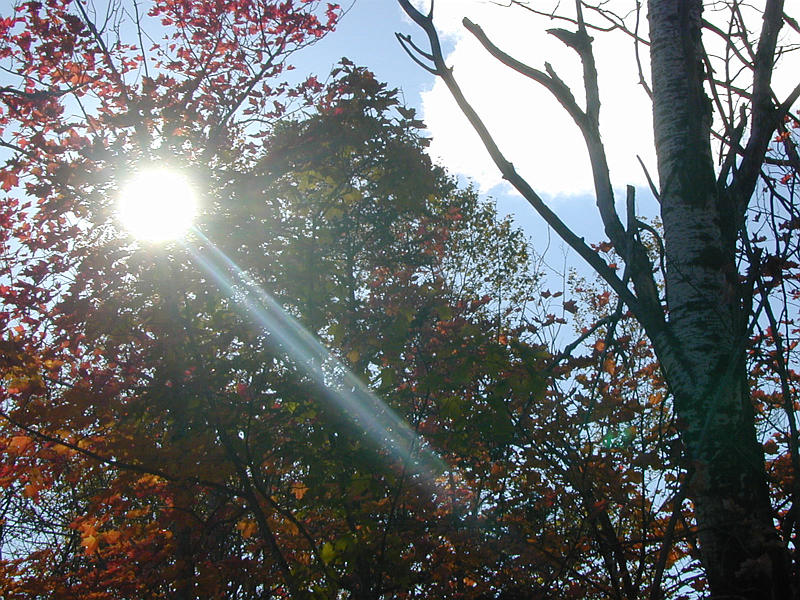
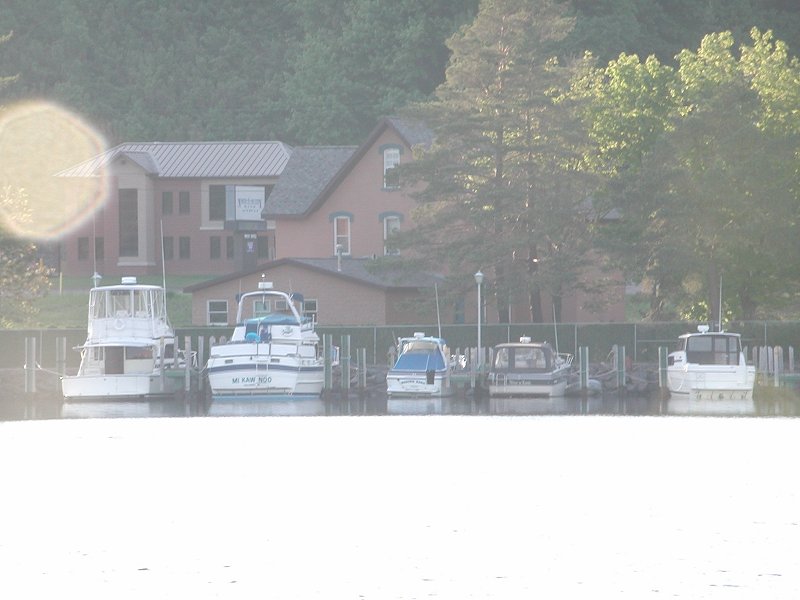
When you point the lens to the sun or a very strong light source, lens flare and ghost may occur in your image. The left image below shows the effect of lens flare. The area near the bright spot is washed out. In fact, flare occurs even though the strong light source is not in the image. Flare occurs due to light bouncing off the glass surfaces of the lens (i.e., internal reflection) rather than being transmitted through. Because of this internal reflection, image contrast and tonality are reduced. The right image below shows an extremely bad lens flare effect. The strong sunlight is in the upper-left corner, but not in the image. Due to the reflection of the sunlight from the water surface, the lower one-third of the water completely washes out. In fact, the reflection reduces the contrast of the whole image, making it quite foggy. Therefore, if a strong light source is in the image or near the image, lens flare may occur. Should this happen, either change your shooting position or use a piece of paper to block the incoming light so that it will not reach the lens.
|
|
| Click on the image to see a larger one | |
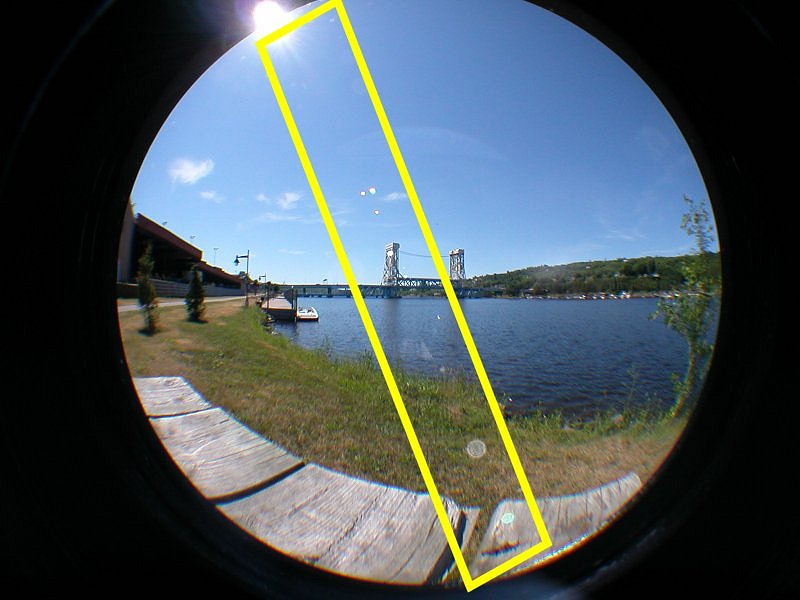
The image below illustrates another effect, ghost, a string of color dots appearing in the image. These dots are usually in green, purple or violet, and have the shape of the aperture of the lens. They are not part of the actual scene. Therefore, they are called ghosts! Most low cost zoom and wide angle lenses, including the on-camera lens, suffer from this problem. Again, you can easily see ghost images on the LCD monitor. Should this happen, change shooting position or use a piece of paper to block the light coming from the strong light source.
|
| Click on the image to see a larger one |
If you hold the T button for more than two seconds when the lens is zoomed all the way in, the camera enters the digital zoom. The zoom scale changes to yellow color and extends pass the vertical divider. To reverse back to optical zoom mode, press or hold the W button until the scale returns back to white color.
What is digital zoom? The camera lens has a maximum focal length of 111mm when the optical zoom mode is being used. Once the camera enters the digital zoom mode, part of the captured image by the lens set to 111mm will be extracted and blown up to fill the whole image. The maximum power of this digital zoom is 4X, which means the in-camera software will extract the 1/16 = 1/42 center portion and make it a full size image. Therefore, when you feel the optical zoom insufficient, the use of digital zoom will reach farther. Unfortunately, there is a price to pay: image quality is lower. Why? Suppose a 800×600 center portion is extracted (i.e., 2X digital zoom) and blown up to 1600×1200. The in-camera software will fill the 1600×1200 image will information in addition to the original 800×600. This is referred to as an interpolation. The problem of this "creating new information from nothing" is that the added ones may not be accurate enough, and, as a result, the resulting images always look blurry or fuzzy.
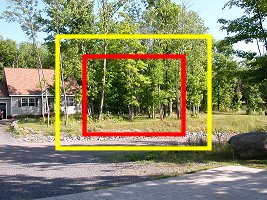
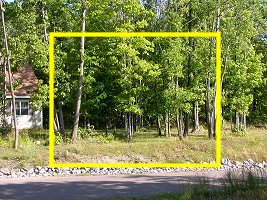
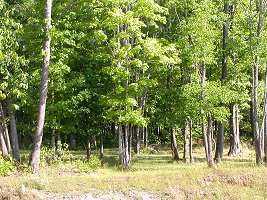
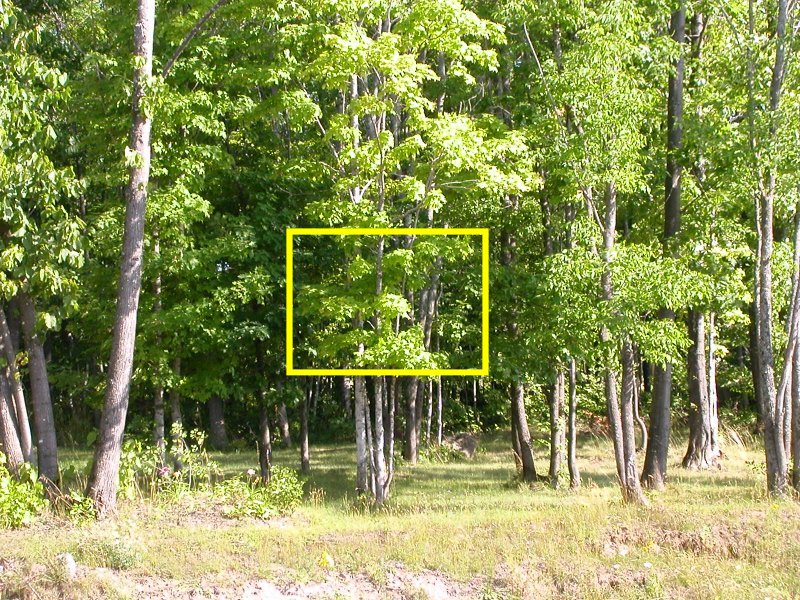
The following is an example. The left image below was taken when the lens is zoomed all the way in to 111mm. Then, hold the zoom button T for about two seconds to enter the digital zoom mode, and zoom all the way in until the scale reaches the right edge (i.e., 4X digital zoom). The image taken with this 4X digital zoom is shown in the right below. The yellow frame in the left image shows roughly the portion captured by the 4X digital zoom. It is clear that this center portion is approximately 1/16 of the original. The right image below is too small to show the difference. However, if you click on the image to see a larger one, you will see the definition of leaves and tree trunks are fuzzy and blurry. In other words, sharpness is significantly reduced. In general, if the resulting images will be reduced for web uses, the loss of sharpness may not be a big issues as shown by the right image below. If you wish to have large prints or view it in its original size on your monitor, you perhaps should avoid the use of digital zoom, especially the higher end (e.g., larger than 3X).
|
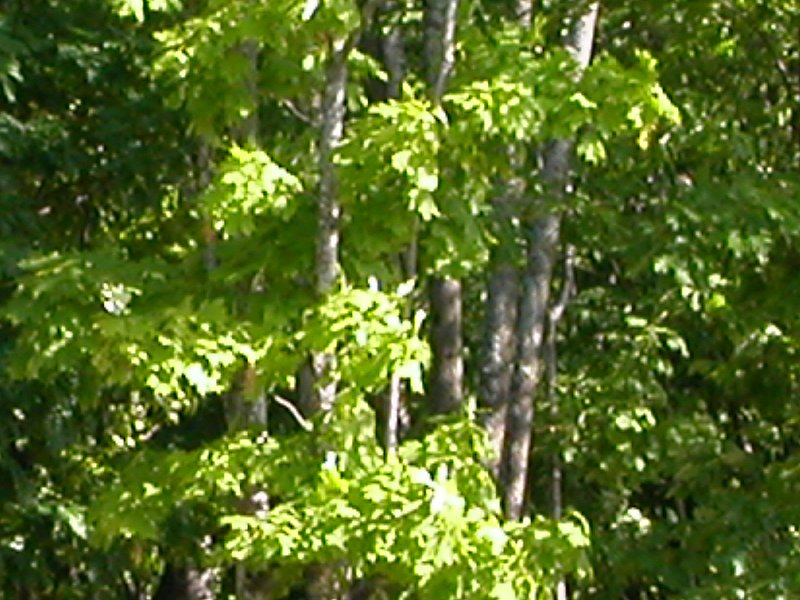
|
| Click on the image to see a larger one | |