Depth of Field

Basics
When a lens focuses on a subject at a distance, all subjects at that distance
are sharply focused. Subjects that are not at the same distance are
out-of-focus and theoretically are not sharp. However, since human eyes
cannot distinguish very small degree of unsharpness, some subjects that
are in front of and behind the in-focus subjects can still appear
sharp. The zone of acceptable sharpness is referred to as the
depth of field. Thus, increasing the depth of field increases
the sharpness of an image. We can use smaller apertures for increasing
the depth of field.
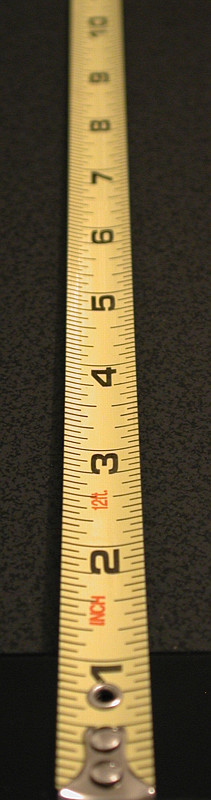
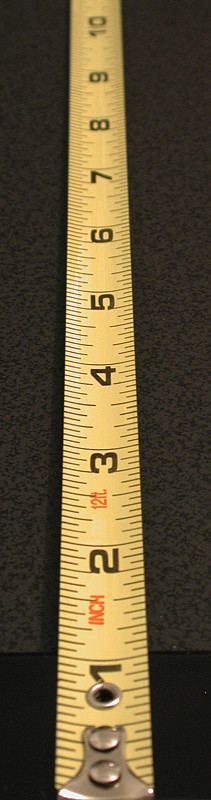
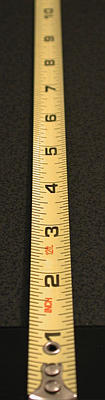
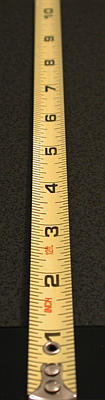
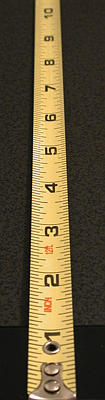
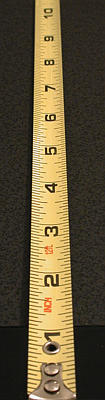
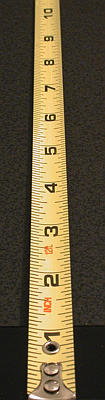
The following shows an example. The lens focuses at the middle
between the 3 inch and 4 inch marks. Thus, the 3 inch and 4 inch marks are
sharp in all images. The 5 inch mark is not very sharp at F3.2, and its
sharpness is improved as the lens closes down to F3.6.
Then, it becomes sharp in all subsequent images. The 6 inch and 7 inch
marks are not sharp until F5.0 and F6.4, respectively. The 8 inch
mark becomes reasonably sharp when the lens closes down to F8.0.
The 9 inch and 10 inch marks are not sharp in all images; but, they become
sharper as the lens closes down. For the foreground, the 2 inch mark
is acceptable at F3.2 and becomes in-focus at F4.0. The 1 inch mark is not
sharp until F5.6, and the lead of the ruler becomes reasonably sharp
at F7.1. As you can see, the range of sharpness (i.e., depth of field)
gets larger as the aperture gets smaller. Therefore, use a smaller aperture
if a greater depth of field is needed. Please check the
Aperture-Priority Mode to
learn more about the use of aperture and its impact on depth of field.

|
|
|

|

|
|
F3.2
|
F3.6
|
F4.0
|
F4.5
|
F5.0
|
|

|
|

|
|
|
F5.6
|
F6.4
|
F7.1
|
F8.0
|
F9.0
|
|
Click on the image to see a larger one
|
Why?
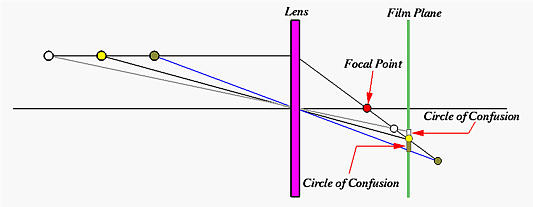
Suppose the lens focuses on the yellow dot as shown in the figure below.
This subject generates a yellow dot on the image plane. Once focused, all
subjects that have the same subject-lens distance as that of the yellow dot
will appear sharp. Now, consider a white dot that is behind the yellow dot
(i.e., with larger subject-lens distance). Since it is out-of-focus,
it will not produce a sharp white dot image. Instead, its image is formed
somewhere in front of the image plane. On the image plane, the image of
this white dot is a circle as shown below. This circle is usually referred
to as a circle of confusion. As the subject-lens distance
increases, the size of this circle increases. The same holds true for
a subject in front of the yellow dot (e.g., the green dot in the
figure below). Since these circles of confusion are actually out-of-focus
images of subjects, if we can reduce the size of circle of
confusion, we can increase the sharpness of the resulting image. But, how?
It turns out to be very simple. Since circles of confusion are formed by
light rays passing through the lens tube, the size of a circle of confusion
is proportional to the amount of light that can pass through the lens tube.
This means smaller (resp., larger) circles of confusion will be formed
if less (resp., more) light can pass through. Restricting how much
light can pass through the lens is the function of aperture in the lens tube.
Therefore, a smaller aperture means allowing less light to reach the
image capturing device, which means we have smaller circles of confusion, and,
as a result, we have a sharper image!
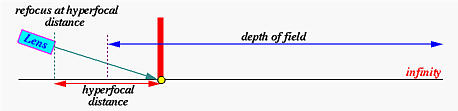
Hyperfocal Distance
In addition to closing down the aperture, we can also focus at the
hyperfocal distance to maximize depth of field. If a lens focuses
at infinity, the depth of field starts at somewhere in front of the lens
and extends to infinity. More precisely, from that point on, the scene
appears sharp, and subjects between that point and the lens are
out-of-focus. The distance from the lens to that point is referred to as the
hyperfocal distance. In the figure below, the hyperfocal
distance is marked with a thick red line.

After determining the hyperfocal distance, we can point the camera at this
distance. The resulting depth of field starts from halfway of the
hyperfocal distance and extends to infinity. This is, in fact, the maximum
depth of field we can get. The concept is shown in the figure below.
Why is this hyperfocal distance important? When shooting a distant subject
or scene, many people point the camera to that subject(s). While the result
may be satisfactory, in many cases the foreground looks out-of-focus.
This is, of course, because of insufficient depth of field. Should this
happen, the above technique becomes very useful:
(1) focus at infinity;
(2) determine the hyperfocal distance;
(3) refocus at the hyperfocal distance;
and
(4) take a photo.
A Reminder
Hyperfocal distance is a function of the aperture being used.
Changing aperture changes hyperfocal distance.
|
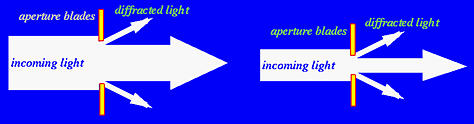
Can We Use the Smallest Aperture to Yield Greater
Depth of Field?
Unfortunately, in general, the answer is "no." As the light rays passing the
lens tube and the aperture blades, some may be diffracted as shown in the
figures below. If the aperture is large, because the proportion of the
diffracted light and the non-diffracted light is so small and is negligible,
diffraction does not contribute to the loss-of-quality very much. See the
left figure below. However, when aperture is small, the amount of light that
can pass through the aperture is reduced and hence the proportion of the
diffracted and non-diffracted light becomes significant. As a result, the
quality of the image is also reduced. See the right figure below.
Therefore, closing the aperture all the way down to the smallest may not
always increase the quality of an image. In general, the quality of a lens
increases as the aperture closes down. This improvement will reach certain
point. After this, quality goes down because of the impact of diffraction.
How to Calculate Depth of Field?
Some Mathematics
An Important Note
Discussion in this section is based on an ideal lens and
is somewhat simplified and theoretical.
Since camera lenses are not perfect and may be different from
manufacturer to manufacturer and even from lens to lens of
the same type made by the same manufacture, depth of field
calculation is not so simple.
|
Circles of Confusion: Revisited
Recall from the concept of circle of confusion that the resolving power of
human eyes is not very high, and, as a result, some sizes of circle of
confusion may be perceived as perfect points. Thus, to understand the
calculation of depth of field, we need to know what is the maximum size of
circle of confusion that would be treated as a point by human eyes.
Unfortunately, this maximum size, or diameter, of circle of confusion depends
on so many factors. The most important fact is certainly the image size.
Suppose the same scene is recorded using two lenses, each of which is used on
a camera with a different image size. If both lenses produce the same size of
circle of confusion and both images are enlarged to the same size, then it
is obvious that the smaller image requires higher magnification ratio to bring
its size equal to that of the larger image. As a result, those circles of
confusion recorded on the smaller image will become larger in the enlarged
image than those from the larger image. Of course, the enlarged image from
the smaller image will not look as sharp as the one from the larger image.
This is why enlargements from large format camera always look sharper than
the enlargements from smaller format cameras. Thus, this is the major reason
that image size has to be a factor in the determination of the maximum size
of circle of confusion.
A common way of incorporating image size into the calculation is to define
the maximum diameter as follows:

Why standard lens? As we all know, a standard lens covers the same angle of
view as human eyes. For example, the standard lens for a 35mm camera has a
focal length of 50mm, while the corresponding focal length on a 990 is 10.5mm.
Therefore, the maximum diameters of circle of confusion for 35mm and 990 are
50/1000=0.05 and 0.0105mm, respectively. Similarly, since 6×6 cm and
4×5 inch cameras have standard lens of focal lengths 80mm and 150mm,
their maximum diameters of circle of confusion are 0.08mm and 0.15mm,
respectively. On a Nikon D1, since its CCD size is smaller than a 35mm
single frame, the lens factor is approximately 1.5. More precisely, a 35mm
lens of focal length f becomes a lens of focal length
1.5*f for D1. As a result, the standard lens of D1 has focal
length 50/1.5 = 33.3mm, and the diameter of maximum permissible circle of
confusion is 0.033mm. It is suggested that for critical applications,
multiply the above values by 0.6. Carl Zeiss even used 0.025 for 35mm
lenses! In summary, we have the following table. In what follows, to
simplify our calculation, we always use
focal-length-of-standard-lens/1000 (i.e., 0.01mm for
950/990 and 0.05mm for 35mm).
|
Diameter |
| Format |
General Use |
Critical Application |
| 950/990 |
0.01mm |
0.006mm |
| 35mm |
0.05mm |
0.03mm |
| 6×6 cm |
0.08mm |
0.048mm |
| 4×5 inch |
0.15mm |
0.09mm |
Hyperfocal Distance: Revisited
The hyperfocal distance of a lens at a given focal length and aperture is
calculated as follows. Note that the diameter of maximum permissible circle
of confusion has to be chosen properly because the same lens used for a
different image size gives a different diameter value.

From this formula, we learn the following:
- The longer the focal length, the larger the hyperfocal distance.
This means that longer lenses have shallower depth of field than
shorter ones.
- The smaller the aperture, the shorter the hyperfocal distance.
This means that a smaller aperture produces larger depth of
field.
- The larger the maximum permissible circle of confusion, the
shorter the hyperfocal distance. This means that if human eyes
can treat a larger circle of confusion as a point, the hyperfocal
distance will be closer to the camera.
Let us compare the hyperfocal distance of 990 and a 35mm lens. Suppose we
fix the focal length of a 990 at 8mm, which is equivalent to 38mm of a 35mm
lens. Here is the computed results, in mm.
| Aperture |
F2.8 |
F5.6 |
F8.0 |
F11.0 |
| 990 @ 8mm |
2286 |
1143 |
800 |
582 |
| 35mm lens @ 38mm |
10314 |
5157 |
3610 |
2625 |
In fact, it is not difficult to verify that under this setting, the 35mm lens
has a hyperfocal distance 4.5 times farther than that of 990. This explains
partially that why images obtained with 990 always look sharper than those
using 35mm lens.
Depth of Field: Revisited
Depth of field is bounded by two distance measures: near and
far, where near is the closest distance (to the
camera) that subjects appear to be sharp and far is the
shortest distance beyond which subjects look out-of-focus (or longest
distance within which subjects appear to be in-focus). Thus, subjects
with subject distances between near and far
appear sharp on the resulting image. Of course, near must be
less than far, and subject distances lies in between.
The following shows the computation formulae.
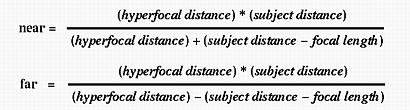
Variables involved are focal length, subject distance (i.e., the
distance between the subject and the camera), and hyperfocal distance.
Note that aperture does not occur explicitly because it is used in the
computation of hyperfocal distance. Therefore, we should not naively conclude
that aperture is not used in the computation of depth of field.
There is one more important note. The subject distance does not have to be
larger than the hyperfocal distance, because once we focus at the hyperfocal
distance (i.e., subject distance = hyperfocal distance), we will have
maximum depth of field, and near is half of the hyperfocal
distance and far is at infinity.
Let us take a look at an example. Let the 990 use focal length 8mm (38mm,
35mm equivalent) at aperture F5.6. Note that the hyperfocal distance is 1143mm
from the above table. If the lens is focused at 100mm (10cm), we
have near = 48mm and far = 109mm; if the
lens is focused at 1000mm (1m), we have near = 535mm and
far = 7570mm. On the other hand, if the lens is a 35mm lens
of focal length 38mm (equivalent to 990's 8mm) at the same aperture F5.6.
The above table gives the hyperfocal distance 5157mm. If the lens is focused
at 100mm (assuming it is possible), we have near = 99mm and
far = 101mm; if the lens is focused at 1000mm, we have
near = 842mm and far = 1229mm. The following
table summarizes these information:
|
Subject dist = 100mm |
Subject Dist = 1000mm |
| Camera |
Near |
Far |
Length |
Near |
Far |
Length |
| 990 @ 8mm and F5.6 |
48 |
109 |
61 |
535 |
7570 |
7035 |
| 35mm lens @ 38mm and F5.6 |
99 |
101 |
2 |
842 |
1229 |
387 |
From this table, it is easily seen that 990's short focal length produces
a much longer area within which subjects appear sharp than an equivalent 35mm
lens can produce. This is why images obtained from a 990 appear to be
sharper. The crucial part is image size which makes the diameter of maximum
permissible circle of confusion much smaller than the 35mm counterpart!
This is also the reason that you cannot obtain a blurred background that
can be usually produced by 35mm lenses using larger apertures.