When you raise the internal flash, by default, it is set to the automatic mode (resp., the previously used flash mode) if the camera is in A-REC (resp., M-REC). However, the internal flash may not fire in M-REC even though it is raised, because it may have been turned off. Click here to learn how to turn the internal flash on and off.
When the internal flash is raised, four different modes can be used in both
A-REC and
M-REC. Each
flash mode is indicated by a special icon shown on both the control
panel and the LCD monitor as discussed on the
Overview page.
If the internal flash is not raised, the setting
is no flash, and icon ![]() (resp.,
(resp., ![]() ) appears on the control
panel (resp., LCD monitor).
) appears on the control
panel (resp., LCD monitor).
To change flash mode, press the flash setting button (see below).
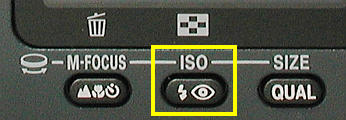
When the internal flash is raised, pressing the flash setting button will set the flash mode to one of the four settings in the order as shown below.

Under the auto-flash mode, the internal flash fires when the camera detects that the illumination of the scene is insufficient. The auto flash with red-eye reduction is useful when shooting people. See the section of Red-Eye Reduction for the details. The red-eye reduction function is shown by an eye icon. Under the anytime flash mode, the internal flash always fires. It is indicated by a flash icon on the control panel and the LCD monitor. This mode is very useful for fill flash. For example, if your are shooting backlight (i.e., a strong light source such as the sun is behind your subject), the front part of your subject could be too dark (i.e., under-exposed). In this case, you can use this anytime flash mode to illuminate the front part of your subject. Under the Slow Synchronization mode, SLOW appears. Slow synchronization is very useful when you are shooting in low light condition and want to preserve the background. Finally, folding the internal flash down deactivates the flash.
The use of the internal flash is very easy. However, a couple of useful hints may be very helpful. The internal flash can be used as fill flash. More precisely, even though lighting condition is good, we still can use the internal flash to open up shadows. In the left image below, strong sun light is near the upper-left corner (i.e., back light). Thus, +1 stop exposure compensation is applied to show the details; however, this exposure compensation washes out the background. To overcome this problem, we can raise the internal flash and enter the anytime flash mode. The right image below shows the result. As you can see, the details of the main subject and the background is preserved.

|

|
| No flash (+1 stop compensation) | With Flash |
| Click on the image to see a larger one | |
The left image below was taken in a forest. Illumination was good enough; but, contrast was low. To increase contrast and obtain more saturated colors, Anytime Flash was activated. However, because the background is far away and cannot be illuminated with the low power internal flash, the background is under-exposed even though fill flash is used. To capture the background, Slow Synchronization was used. Therefore, both the subject and background are properly illuminated as shown in the right image below. Note the Red-Eye effect. The controls of red-eye and slow synchronization cannot be used at the same time with Coolpix 950/990/995, and, as a result, when we use slow synchronization to capture the background, we lose the chance to remove red-eyes.

|

|
| Fill flash only | With slow synchronization (b) |
| Click on the image to see a larger one | |
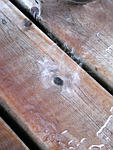
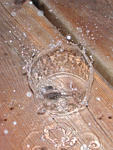
Because the flash synchronization shutter speed is 1/125 sec, sometimes we can take advantage of this "faster" shutter speed. I tried to photograph the effect of water-drop in a rainy day. Since the lighting condition was not good, the shutter speed can only reach about 1/15 sec. The result is shown in the left image below. As you can see, the impact or a water drop blurs and does not show anything interesting. Then, I set the internal flash to the Anytime Flash mode to force the internal flash to fire. The faster shutter speed helps reveal the impact of a water drop.
|
|
| Without flash | With fill flash |
| Click on the image to see a larger one | |