| If you use a non-Nikon flash, please click here to see if you have the right accessories before continue. |
In the Automatic (A) mode, the sensor of the external flash takes over the control of flash exposure. In the Manual (M) mode, we return to the basics and do everything about flash exposure ourselves. More precisely, we choose an ISO speed and an aperture (resp., a flash-subject distance) and calculate the flash-subject distance (resp., aperture). The camera only triggers the flash to fire, and when the flash fires, it always sends out maximum power. Therefore, if the aperture is too large or the flash-subject distance is too short, the image is likely to be over-exposed. On the other hand, if the aperture is too small or the flash-subject distance is too large, the image is likely to be under-exposed. Therefore, You'd better know what you are doing because you control the flash completely. A flash meter may be very helpful. Before we go on, please review the Automatic (A) mode first because these two modes are very similar and techniques for the Automatic (A) mode can also be applied to the Manual (M) mode.
The Manual (M) mode is not very different from the Automatic (A) mode and is not very difficult to use, if you know the Automatic (A) mode well. It provides you with a total control of your flash and your camera. The following is a possible procedure of using and external flash that has an aperture setting.
An Important Note
Your external flash may not be powerful enough to illuminate the scene with a given aperture. Recall that the guide number of a flash is equal to the product of flash-subject distance and aperture. Therefore, if the selected aperture is small (resp., large), the flash-subject distance must be short (resp., long) to properly illuminate the scene. For example, suppose we use ISO 100 and a flash of GN 50. If we choose to use F8.0, the flash-subject distance should be less than or equal to 50/8 = 6.25 ft. If the flash-distance is larger than this value, the image will be under-exposed. Should this happen, use a larger aperture or move your flash closer to the subjects. Moreover, the aperture of the on-camera lens changes when zooming. Hence, you might need to reset the on-flash aperture or to reposition the flash. To overcome this problem, you might want to consider the Fixed Aperture feature. |
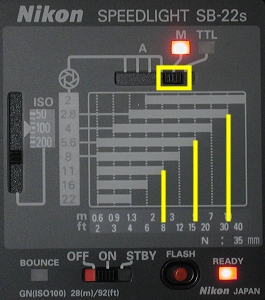
The following are a number of examples that illustrate the use the back panels of a number of flashes. The first one is the Nikon SB-22s. First, we need to set the switch to M. Second, use the slide to set an ISO speed. While the slide is moving, the aperture values will align with some horizontal scales which provide the desired flash-subject distances. In the following image, we see that apertures F2.8, F4.0, F5.6, F8.0 and F11.0 have flash-subject distances 30 ft, 20 ft, 15 ft, 12 ft and 8 ft, respectively. Thus, if we choose aperture F5.6, the flash should be placed at a distance of 15 ft from the subjects. On the other hand, if the flash-subject distance is 12 ft, then we should use aperture F8.0.
|
| Nikon 22s's back panel |
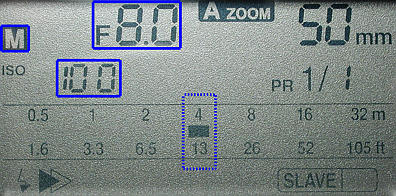
The following image is the Sunpak PZ5000 AF's back panel. It shows that the flash is in the M mode with ISO speed 100, focal length 50mm, aperture F8.0, and flash-subject distance 13 ft.
|
| Sunpak PZ5000 AF's back panel |
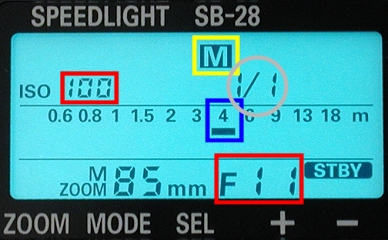
The following is the back panel of the SB-28. It shows that the flash is in the manual mode with ISO speed 100. The zoom is set to 85mm and aperture is F11. The flash-subject distance is 4m which is about 12 ft. When the flash is set to the M mode, make sure that the FP indicator below M disappears and that the power ratio is 1/1 as shown in the image below. Otherwise, you may not get the desired result.
|
| Nikon 28's back panel |
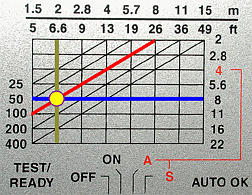
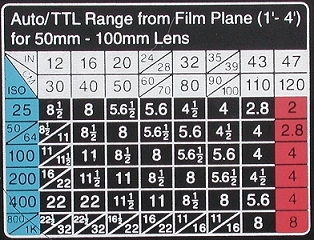
What if your flash does not have an aperture setting? Do not worry. Most flashes have a table like the one shown below. You simply choose an aperture (resp., flash-subject distance) and follow the horizontal (resp., vertical) line of the aperture (resp., flash-subject distance) until it intersects with the ISO speed diagonal line. The intersection point provides you with the desired flash-subject distance or aperture. The following is the table on the back panel of a Sunpak Digital Flash. The newer Sunpak DS 20 flash has the same table.
|
| Sunpak Digital Flash's back panel |
The following is another way of presenting the ISO, aperture and flash-subject distance information. Suppose the ISO speed is 100. The row of 100 shows the relationship between aperture and its corresponding flash-subject distance. For example, if the flash-subject distance is 16 (resp., 32) inches, check the intersection of the row of 100 and the column of 16 (resp., 32) and the corresponding aperture is F11.0 (resp., F5.6 1/2). On the other hand, if the aperture is known, we simply scan the row of 100 to locate the aperture value. The column that contains the aperture gives the corresponding flash-subject distance. For example, if the desired aperture is F8.0, the corresponding column heading shows 24/28 inches. This means that F8.0 would work fine with a flash-subject distance of 24-28 inches. Note that different flashes have different levels of output power, and, hence, their tables will also be different.
|
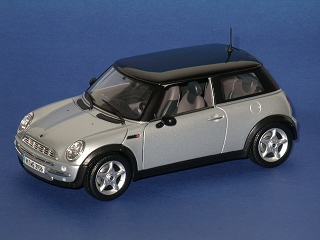
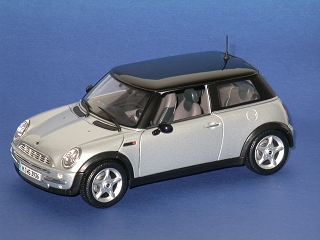
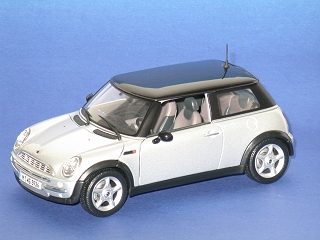
The following is an example. These images were taken with a TC-E3ED 3x lens converter. A SB-28 was placed very close to the camera. Therefore, the flash-subject distance and camera-subject distance are equal and are both equal to 8 ft. The SB-28 was set to the Manual (M) mode. The apertures used on the flash and camera are shown below each image. Image (a) is under-exposed, the gray color in image (b) is very similar to the real thing and is well-exposed, and image (c) is over-exposed. On the other hand, if the camera still uses F11.0 and the flash uses F16.0, the flash will send out more power (actually twice of F11.0), the result is in image (d) and is similar to that of image (b). Therefore, to adjust exposure, we can either make the lens aperture larger or use a smaller flash aperture.
|
|
| (a) Flash F11.0, Camera F11.0 | (b) Flash F11.0, Camera F8.0 |
|
|
| (c) Flash F11.0, Camera F5.6 | (d) Flash F16.0, Camera F11.0 |
| Click on the image to see a larger one | |
In theory, it is easy to use multiple flashes in the TTL-mode. However, the pseudo-TTL mode of the Coolpix may not help create correctly exposed images. The Manual (M) mode gives us a complete control of all flashes and the camera. To illustrate this, let us take a look at a simple example. For multiple flash, the GN of the combined guide number is the square root of the sum of the squares of the GN of each individual flash. In this example, we use two small Sunpak flashes, the Sunpak Digital Flash (GN 52 ft) and Sunpak DS 20 (GN 59). Thus, the sum of squares is 522 + 592 = 6185. Therefore, the GN of the two-flash system is the square root of 6185, which is 78.6.
To connect these two flashes, we use a AS-E900 and a SC-17. This connects the camera to the Sunpak Digital Flash in the setup image below. Then, one end of a SC-18 cable plugs into the TTL multi-flash connector of the SC-17, and the other end to a AS-10 multi-flash adapter. The Sunpak DS 20 is on the hot-shoe of the AS-10. Click here to learn more about these accessories.
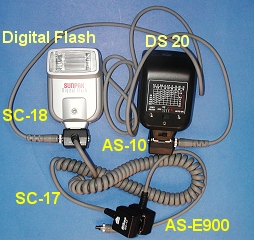
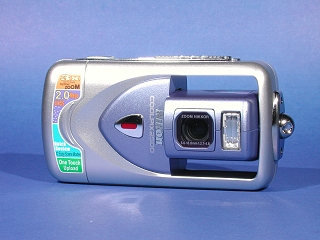
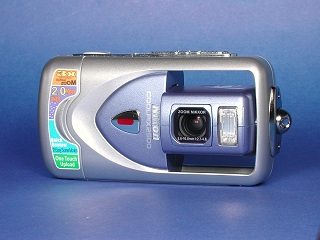
The scene has only one subject, a Coolpix 2500. The Sunpak flashes do not have aperture setting, and, as a result, carefully positioning the flashes to maintain a reasonable flash-subject distance is necessary. Image (a) below was taken using the following parameters: camera aperture F11.0, one flash position to the left of the subject and the other to the right with both being above the subject in a 45 degree angle. The flash-subject distance was about 2 ft. If you are careful, you might immediately ask a question: Since GN 52/2 = 26, it seems the aperture should be F26.0 rather than F11.0. You are right. The image is slightly over-exposed! But, why use F11.0? It is because I hope to maintain the same aperture value. Note that since the flashes generate direct illumination, two strong shadows are very visible. To remove shadows, we should bounce and/or diffuse the flash illumination.
|
|
| (a) Direct flashes | (b) Bounced flashes |
|
|
| (c) Diffused flashes at F11.0 | (d) Diffused flashes at F8.0 |
| Click on the image to see a larger one | |
Then, a semi-transparent screen (i.e., diffuser) was placed above and close to the subject, and all camera and flash parameters were not altered. The result is shown in image (c) above. Compare image (a) and (c) and you should see that lighting is much softer in (c) than in (a). However, since the diffuse diffuses the flash light, a portion of light is lost. Exactly how much depends on the material of a diffuser. Consequently, image (c) is a little under-exposed. To correct this problem, the camera aperture is set to F8.0 to open up one stop and the result in image (d) looks much better. If you use a flash that permits setting aperture, you can set the flash aperture to F16.0 and keep the camera aperture to F11.0 and you still get the same result. The exposure of this image seems correct, and the two ugly shadows disappear. Moreover, the illumination looks very soft and smooth.
Finally, let us bounce the flash light. As in the diffuse case, bouncing flash light also causes light loss. As mentioned above, this combo has a GN equivalent to 78 (ft), to maintain the same F11.0 aperture, we pull both flashes together to simulate a single flash of GN 78. Than, a sliver reflector is used to reflect the flash illumination from this combo to the subject. The result is in image (b). It is clear that the image still is slightly under-exposed; however, moving the flashes and reflector closer to the subject or open up the camera aperture will solve this problem. The shadow is still visible; however, it is much more soft than that of the direct illumination in image (a). Moreover, the shadow and illumination of image (b) are not as soft and smooth as the diffused result as shown in image (d).
Once you are used to the way of calculating aperture from flash-subject distance (and vice versa) and knows the characteristics of your flashes well, the Manual (M) mode is actually very simple and its quite similar to the Automatic (A) mode. Moreover, by choosing a larger flash aperture (smaller Fx.y), fill-flash is also possible. We shall discuss this topic elsewhere.
Two Important Notes
|