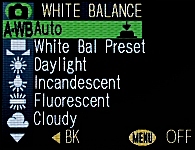
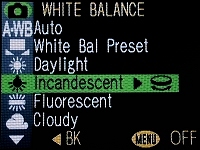
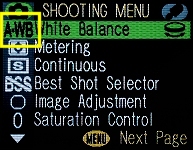
The 4500 has an automatic algorithm for selecting a "correct" color temperature, and permits the user to overwrite this automatic capability by indicating a particular color temperature to be used. Based on the range of color temperatures, the 4500 has the following categories: (1) automatic, (2) daylight, (3) incandescent light, (5) fluorescent light, (6) cloudy, (4) speedlight (i.e., flash), and (7) white balance preset. The first one permits the camera to find the "best" possible white balance. This is a very convenient mode and is correct for most situations. The last is the most flexible one because we can tell the in-camera algorithm what the white color looks like under the current lighting situation. If you are not satisfied with your result with the other modes, give this one a try. All the other five have their usual meaning and do not require further explanation.
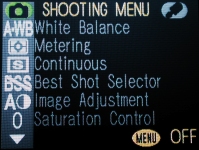
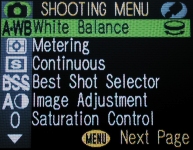
To select a white balance mode, the camera must be in P, A, S or M mode. The following is a procedure for selecting a white balance mode.
|
|
|
|
| Press the shutter release button will clear the WHITE BALANCE menu temporarily to show the result of the highlighted white balance mode. In fact, one can even take a picture while the screen shows the WHITE BALANCE menu. After a picture is taken, the screen returns to the WHITE BALANCE menu. |
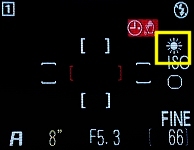
After selecting a white balance mode, its icon appears on the LCD monitor and on the first column of the white balance selection menu. However, no icon will be shown when Auto is selected. The following images illustrate the selected white balance mode and the location of the white balance icon (i.e., incandescent light) on the LCD monitor.
|
|
|
||||
| Auto selected | Incandescent selected | Incandescent selected on LCD | ||||
The following table shows the white balance modes and their corresponding icons.
| White Balance Mode | Keyword | Icon |
| Automatic | Auto |  |
| White Balance Preset | White Bal Preset |  |
| Sunlight | Daylight |  |
| Incandescent | Incandescent |  |
| Fluorescent | Fluorescent |  |
| Cloudy/Rainy Day | Cloudy |  |
| Electronic Flash | Speedlight |  |
After knowing the meaning of each icon, the 4500 has an easy way of selecting a white balance mode using the command dial:
The white balance preset mode permits us to tell the camera what the white color should look like in the image under the current color temperature. This mode can help us determine a correct color temperature under some difficult situations. What we have to do is showing to the camera a white paper so that the camera sensor can read off the color temperature information from that white paper and setup the camera's white balance algorithm properly.
After selecting White Bal Preset, a new screen appears as shown below.
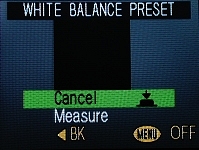 |
At this point, put a white or light gray paper/object at the position of the subject you wish to photograph, and point the camera to the white paper so that the image of the white paper covers the small square on the LCD monitor completely without shadow. Then, press the down arrow of the multi-selector to highlight Measure and press the multi-selector button to select. It will take a couple of seconds for the camera to adjust itself. After this is done, the camera will use the "memorized" white color to set its color temperature.
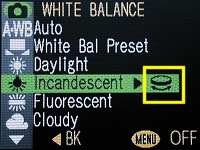
Once a particular white balance mode is highlighted in the selection
process, we shall see the command dial icon
(i.e.,  ) near
the right side of the LCD monitor. This is for fine-tuning the selected white
balance mode. This fine-tuning is only available to the following modes:
Daylight,
Incandescent,
Cloudy and
Speedlight.
The Fluorescent can also
be fine-tuned, but the setting is slightly different.
) near
the right side of the LCD monitor. This is for fine-tuning the selected white
balance mode. This fine-tuning is only available to the following modes:
Daylight,
Incandescent,
Cloudy and
Speedlight.
The Fluorescent can also
be fine-tuned, but the setting is slightly different.
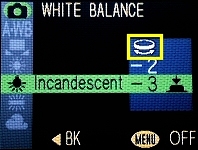
When you see the command dial icon appeared at the end of a white balance selection item (left below), you can turn it to highlight a level of adjustment between -3 and +3 (right below). Then, press the multi-selector button to make a selection.
|
|
Setting to a higher (resp., lower) value causes more blue (resp., red) light to be captured, making the resulting image a little more bluish (resp., reddish or yellowish). For example, if you feel an image taken with the Incandescent mode is still too reddish/yellowish, you might want to use the setting of +1, +2 or even +3 to add a stronger blue cast to counter the reddish/yellowish cast. On the other hand, if you feel an image taken with the Daylight mode is too blue, you can reduce this blue cast by using a setting of -1, -2 or even -3. The 0 setting is the default, meaning no color temperature compensation is used. The following is an example. As you can see, the red/yellow cast becomes less as the adjustment decrease from -3 to -1. Then, the blue cast phases in as the adjustment increases from +1 to +3. The tonality change is subtle; but, it is there. The tonality of the image using white balance preset is quite accurate. In fact, it is much better than every image taken with an incandescent setting.

|

|

|
| Auto | White Balance Preset | Incandescent |

|

|

|
| Incandescent -3 | Incandescent -2 | Incandescent -1 |

|

|

|
| Incandescent +1 | Incandescent +2 | Incandescent +3 |
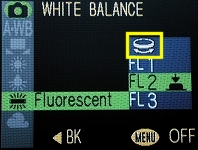
The Fluorescent mode has three settings FL1, FL2 and FL3. See the left image below. The meaning of each setting is shown in the table below. Note that there is no negative settings, and the default setting is FL1.
|
|
The following images were taken in a room illuminated mainly by white fluorescent lights with all three different fluorescent settings.

|

|

|
| FL1 | FL2 | FL3 |
Note that the color temperature compensation setting is not shown on the LCD monitor. You need to enter the white balance menu to see the previous setting. A related technique is White Balance Bracketing.