
|
| Flash sensors: Nikon 22s, Nikon SB-28 and Sunpak Digital Flash |
| If you use a non-Nikon flash, please click here to see if you have the right accessories before continue. |
If you have played with film cameras or other non-Nikon digital cameras, it is likely that you have one or more flashes that are not TTL compatible with the Nikon's. For example, you might have flashes for your Canon, Olympus or Sony which are not TTL compatible with 990. Or, you might have some non-TTL flashes for your older cameras (e.g., the popular Vivitar Model 283). Although these flashes cannot be used with 990 in the TTL mode, they might be used in the Automatic mode, or the A mode.

|
| Flash sensors: Nikon 22s, Nikon SB-28 and Sunpak Digital Flash |
What is this Automatic mode? Many flashes, including the TTL-capable ones, have built-in flash sensors for measuring the flash illumination as shown above. A user sets the ISO speed (Sensitivity in our case) and an aperture on the flash. The camera only fires the flash and does not control the flash. Instead, the sensor on the flash measures the flash illumination and cuts the power off when the illumination is sufficient based on the given ISO sensitivity and aperture. Thus, Automatic means exposure is controlled by the flash automatically rather than by the camera.
It is possible that the aperture is too small so that the illumination is insufficient even though the flash has reached its maximum power. If this happens, you will get an under-exposed image. On the other hand, it is also possible that the aperture is so large that the illumination is too strong even though the flash uses its minimum power. In this case, you will get an over-exposed image.
It is easy to use the Automatic mode with your 990. The following is a possible procedure of using an external flash that has an aperture setting.
An Important NoteYour external flash may not be powerful enough to illuminate the scene with a given aperture. Recall that the guide number of a flash is equal to the product of flash-subject distance and aperture. Therefore, if the selected aperture is small (resp., large), the flash-subject distance must be short (resp., long) to properly illuminate the scene. For example, suppose we use ISO 100 and a flash of GN 50. If we choose to use F8.0, the flash-subject distance should be less than or equal to 50/8 = 6.25 ft. If the flash-distance is larger than this value, the image will be under-exposed. Should this happen, use a larger aperture or move your flash closer to the subjects. Moreover, the aperture of the on-camera lens changes when zooming. Hence, you might need to reset the on-flash aperture or to reposition the flash. To overcome this problem, you might want to consider the Fixed Aperture feature. |
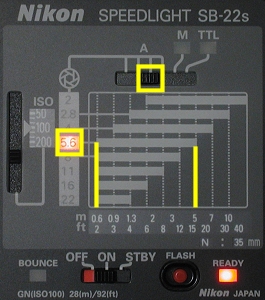
Let us use an example to illustrate this procedure. Although the flash used is a Nikon SB-22s, most flashes should share the same procedure. The vertical slide in the left edge of the back panel is for choosing the ISO speed. In the left image below the ISO speed is set to 100. Many flashes do not permit to choose an arbitrary aperture in the Automatic mode. Instead, they provide a number of pre-selected apertures. In the case of SB-22s, there are four such selections as shown in the top part of the image (i.e., four positions under the letter A). The slide is positioned at the second aperture setting from the right. Note that the flash is in the A mode. With this setting, the flash selects F5.6, which is highlighted. Then, the horizontal scale next to 5.6 provides the effective range of using F5.6. In the image, it is 2 ft to 15 ft. Therefore, as long as the flash-subject distance is within this range, the subject will be properly illuminated. What we need to do is to set the camera to use aperture F5.6 in the aperture-priority mode, and take the shot. Note that what is important is the flash-subject distance rather than the camera-subject distance. Hence, as long as the flash-subject distance is within the indicated range, it does not matter how large or how small the camera-subject distance is. Well, at least in theory!
|
|
| Nikon 22s's back panel | |
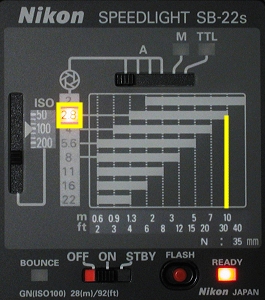
On the other hand, we can also use flash-subject distance to find an aperture. Suppose the flash-subject distance is slightly larger than 20 ft. From the 20 ft vertical line as shown in the right image above, we see that aperture F2.8 is needed. Hence, both the flash and camera are set to use F2.8.
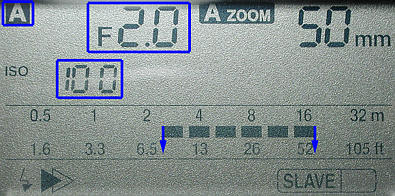
The following is the back panel of Sunpak PZ5000 AF. It shows that the ISO speed and aperture are 100 and F2.0, respectively. The scale indicates under F2.0 the effective distance is about 7 ft to 52 ft. Thus, as long as your subjects are within this range, the A mode will illuminate the scene properly.
|
| Sunpak PZ5000AF's back panel |
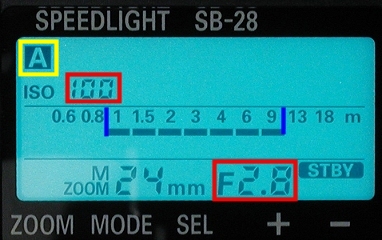
The following is the back panel of Nikon's B-28. It shows that the ISO speed is 100, the aperture used is F2.8, and the effective flash-subject distance is approximately 1 meter (3 ft) and 10 meter (30 ft).
|
| Nikon SB-28's back panel |
It is possible that your flash unit does not allow you to set the aperture. In this case, the procedure discussed in the previous section may not work. However, you still can use the Automatic mode, if your flash does support it. Here is a modified procedure:
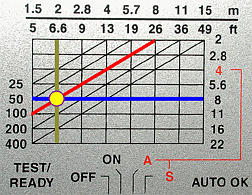
Let us take a look at an example. Most non-TTL flashes have some kind of "exposure" table on their back panel. The form may vary; but, the idea is to incorporate the relation of ISO speed, aperture and flash-subject distance into an easy-to-read table. The following is the table on the back panel of Sunpak's Digital Flash. (The Sunpak DS 20 has the same table.) This is a generic non-TTL flash that can be used in the automatic mode, manual mode and slave mode. Other flashes may have a table different from this one; but, in general, the way of using it should be similar. The ISO speed is represented as south-west to north-east diagonal lines (shown in red). On each diagonal, there are a number of combinations of aperture (shown in blue) and its corresponding flash-subject distance (shown in green). Suppose we intend to use ISO speed 100. Then, we should look up the diagonal starting with the corresponding ISO speed. In the figure this diagonal is shown in red. If the selected aperture is F8.0, we should trace the horizontal line starting with F8.0, shown in blue, until it intersects the diagonal. The vertical line through the intersection point, shown in green, gives the flash-subject distance 6.6 ft. On the other hand, if the position of the flash is chosen first at some distance, say 13 ft, then we should trace the vertical line starting with 13 ft until it intersects the diagonal. The horizontal line through the intersection point gives the corresponding aperture. In this case, the aperture is F4.0.
|
| Sunpak Digital Flash's back panel |
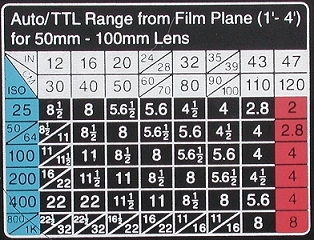
The following is another way of presenting the ISO, aperture and flash-subject distance information. Suppose the ISO speed is 100. The row of 100 shows the relationship between aperture and its corresponding flash-subject distance. For example, if the flash-subject distance is 16 (resp., 32) inches, check the intersection of the row of 100 and the column of 16 (resp., 32) and the corresponding aperture is F11.0 (resp., F5.6 1/2). On the other hand, if the aperture is known, we simply scan the row of 100 to locate the aperture value. The column that contains the aperture gives the corresponding flash-subject distance. For example, if the desired aperture is F8.0, the corresponding column heading shows 24/28 inches. This means that F8.0 would work fine with a flash-subject distance of 24-28 inches. Note that different flashes have different levels of output power, and, hence, their tables will also be different.
|
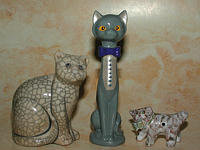
Let us use an example to illustrate the differences between the TTL mode and the A mode. The following images were all taken from the same scene. A Nikon SB-22s (GN 90 in ft and 28 in m at ISO 100) was used with a flash-subject distance 28 inches (2.3 feet). The flash synchronization speed and aperture are 1/125 sec and F7.9, respectively. Images on the first row were taken using the TTL mode. The second and the third used variable power with +1.0 stop and +2.0 stop increase of the external flash power. Images on the second row were taken with SB-22s's automatic (A) mode. From left to right, the apertures used were F7.9, F5.6 and F4.0. Note that the increment is one stop. Note also that 28 inches flash-subject distance for ISO 100 gives an aperture F8.0 on SB-22s.

|

|

|
| TTL Mode | TTL Mode with +1.0 stop | TTL Mode with +2.0 stop |
|

|

|
| A Mode F7.9 | A Mode F5.6 | A Mode F4.0 |
| Click on the image to see a larger one | ||
Compared the two images on the first column, the one with the A mode is darker than the one with the TTL mode. Because the scene contains light colored subjects and background, both methods yielded under-exposed images. We can use variable power to increase the flash output for exposure compensation in the TTL-mode. However, variable power has no effect in the A mode. In fact, all images taken with the TTL mode are brighter than those with the A mode. Of course, your flash may yield a different results; but, before using it in the A mode, it is a good idea to calibrate and compare it against the TTL mode to understand if any adjustments would be necessary.
In the A mode, we can use a larger camera aperture and fix the flash-subject distance for exposure compensation. This is equivalent to the use of variable power in the TTL mode. Because F5.6 is one stop wider than F7.9 and F4.0 is one stop wider than F5.6, the brightness of the second and third images on the second row are comparable with the +1.0 stop and +2.0 stop power increase as shown on the first row.
We can also change the flash-subject distance to perform exposure compensation. For example, suppose the flash-subject distance is d. If we want to keep the aperture fixed and increase (resp., decrease) the flash illumination by one stop, then we can simply change the flash-subject distance to d/2 (resp., 2d).
Some good flashes provides a dial on the back panel for setting flash compensation. This is of course a more convenient way. Check your flash manual for the details.
If your camera is capable of TTL, it is unlikely you will use the Automatic mode. But, the Automatic mode still is useful when you have a lens converter mounted. Since a lens converter may block the on-camera flash sensor partially or completely, the TTL mode will not work properly. See Nikon Lens Converters for the details. In this case, the Automatic mode will be very useful because it uses the on-flash sensor rather than the on-camera one. Let us use an example to illustrate this idea.
|
|
|
| F7.9 | F7.0 | F8.9 |
| Click on the image to see a larger one | ||
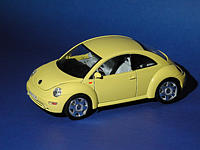
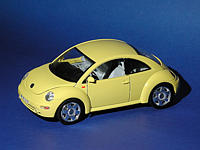
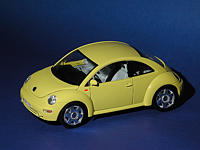
The above shows some images of a 1/18 scale model taken with a TC-E3ED 3x converter which blocks the coverage of the flash sensor. Therefore, the TTL mode is infeasible and the A mode is used. A Nikon SB-22s is positioned 45 degree above the model with a flash-subject distance 3 ft. To gain depth, F8.0 is used which is within the effective distance. The camera-subject distance is 5.5 ft and is set to the aperture-priority mode with aperture F7.9. As you can see from these images, by varying the on-camera aperture, even with the A mode you still can take decent photos.
In some situations such as in a party, the camera-subject distance and flash-subject distance are almost equal (because the flash is perhaps mounted on a bracket), the A mode can also be very useful. For example, if we anticipate that the shooting distance is about 10 ft, we can set the flash to the A mode, select an aperture that is good for 10 ft and also use this aperture on the camera. In this case, as long as your subjects are within this distance, you will likely get decent images. Use a larger (resp., smaller) aperture (of the on-camera lens) if your flash-subject distance is larger (resp., shorter) than the indicated flash effective distance.
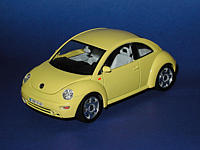
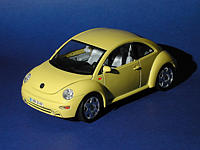
Keep in mind that the on-flash sensor measures flash illumination in the direction it faces rather than the direction that the on-camera lens points to. As a result, the exposure may be determined by an unexpected area in your scene. The following is an example. The camera is about 2.5 ft from the subject. The images on the first row were taken with a Nikon SB-22s at the same position. The images on the second row were taken with the external flash moved to the left about 45 degree and maintained the same flash-subject distance (i.e., 2.5 ft). It is clear that the on-camera flash sensor produces brighter images than those obtained with the on-flash sensor. Look at the first image on the second row. Because the flash points to the front of the model and the on-camera sensor looks at the center of the image, the latter increases the exposure so that the center part of the image would be brighter. However, this over-exposes the front part. On the other hand, in the automatic mode, the on-flash sensor reads the light intensity of the front part of the model and stops when the illumination is sufficient. Consequently, the center part of the image will not be as bright as the one obtained in the TTL mode.
| |
TTL Mode | Automatic (A) Mode |
| Front position | 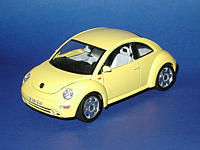
|
|
| Side position | 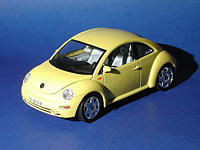
|
|
| |
Click on the image to see a larger one | |
When you set the aperture on a flash to F8.0, you effectively tells the flash that "I am going to use F8.0 to take a picture." and asks the flash to fire sufficient power to illuminate a scene under F8.0. Suppose F8.0 is the "correct" flash aperture. What if we set the flash aperture to F11.0? Because now the aperture used is smaller (i.e., F11.0 is half of the F8.0), to have a correct exposure, the flash must double its output power to yield the same exposure as F8.0 does. Similarly, if we set the flash aperture to F16.0, the flash will be four times (resp., twice) higher than the output power when F8.0 is used. On the other hand, if the flash is set to use F5.6, it will only fire half of the power that is needed for F8.0.
So, what is the point? The point is: we can use different flash and camera apertures to achieve flash exposure compensation in the automatic mode. For example, suppose we believe that F8.0 on the camera would be the "correct" exposure. Of course, for most cases, we also set the flash to F8.0. However, if we set the flash to F11.0 and F16.0, the flash will fire twice and four times power than it does when using F8.0. More flash power means more illumination. As a result, if the camera is set to F8.0 and the flash is set to F11.0 (resp., F16.0), the scene is twice (resp., four times) brighter than using F8.0. This means we increase the exposure +1 (resp., +2) stop. On the other hand, if we set the flash to use F5.6, the flash reduces its power to half of that of F8.0. This equivalent to say the exposure compensation is -1 stop!
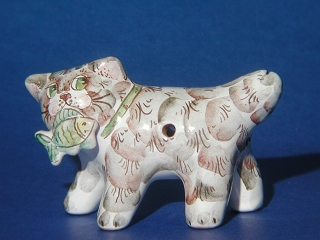
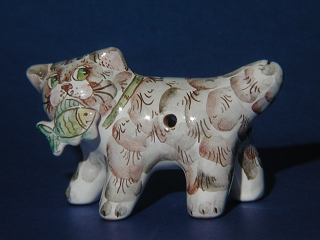
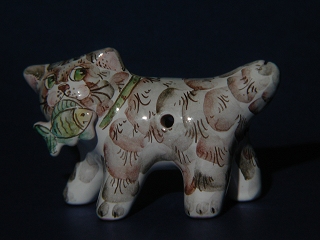
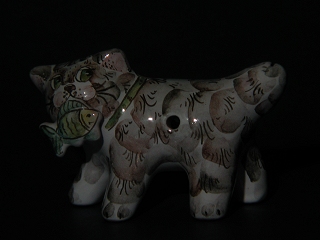
Let us look at an example. The following images were taken using a Kenko 6X with a camera-subject distance 6.5 ft and a SB-28 with a flash-subject distance 4.5 ft. The camera is set to use F11.0. Note that this F11.0 does not factor in the light loss caused by the Kenko 6X. But, it does no harm to our discussion. The four images were taken by setting the SB-28 to use F16.0, F11.0, F8.0 and F5.6. As you can seem the use of F16.0 causes the flash to fire more power and the result is brighter than the one using F11.0. Similarly, the one taken with flash aperture F11.0 is twice brighter than that taken with F8.0.
|
|
| F16.0 | F11.0 |
|
|
| F8.0 | F5.6 |
| Click on the image to see a larger one | |
| If setting the camera and flash to use the same aperture yields an under-exposed (resp., over-exposed) image, then we can use a smaller (resp., larger) flash aperture to force the flash to output more (resp., less) power. Here, smaller (resp., larger) means the F number (i.e., the x.y in Fx.y) is larger (resp., smaller). Note that the use of exposure compensation and different camera aperture will also achieve the same goal. However, in many situations, we simply want the camera to use a fixed aperture for a particular effect (i.e., shallow depth-of-field). |