|
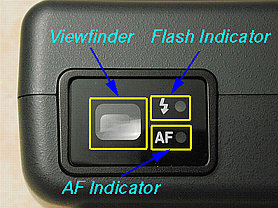
| Viewfinder, Auto-Focus (AF) indicator and flash indicator |
When the mode dial is turned to position A-REC or M-REC, by default, the camera is in the autofocus mode, which means the camera will focus for you. To activate autofocus, point the camera to your subject and press the shutter release button halfway down. If the AF indicator on the back panel of the lens unit turns on, the camera has been successfully focused on your subject. Otherwise, the AF indicator blinks, which means the camera fails to focus on your subject.
|
|
| Viewfinder, Auto-Focus (AF) indicator and flash indicator |
If there is insufficient light to illuminate the subject when the shutter release button is pressed halfway down, the flash indicator blinks. In this case, you still can take photos; however, the shutter speed being may be very low (e.g., 1/4 sec). Check the LCD monitor for this information. Otherwise, you can release the built-in Speedlight (i.e., Nikon's way to name her flash). Thus, when you press the shutter release button all the way down, the flash will fire. Click here to learn more about the built-in flash.
There are two ways to compose your image. The first one is through the use of the viewfinder (see the image above), which is on the back panel of the lens unit. The layout of the viewfinder is shown below.
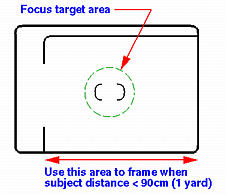
You should make sure that the subjects you want the sharpest are in the focus bracket [ ]. However, parallax exists when the subjects are too close to the lens. Here, parallax means the image you see through the viewfinder is not the image recorded by the camera. To make sure that parallax will not cause any serious problem, when the distance of your subjects and the lens is less than 90cm or one yard, you should place your subjects in the area bounded by the right edge and the two vertical line segments. Subjects not in this area will not be seen in the image.
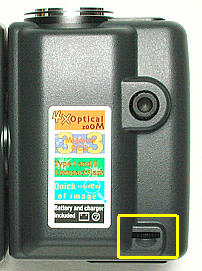
You can use the diopter-adjustment dial to adjust viewfinder focus. The diopter-adjustment dial is located on the front panel of the lens unit as shown below.
The second way, which is more accurate than using the viewfinder and consumes more battery power, is the use of the LCD monitor. If the LCD monitor displays nothing, keep pressing the MONITOR button until an image appears.
The default autofocus setting does not work very well when your subject is closer than one foot. If the distance between the camera and your subject is less than one foot, the AF indicator blinks, indicating an autofocusing problem. If this happens, you should consider to use the close-up setting. Click here to see the details.
Sometimes, the AF indicator also blinks when you are shooting a distant scene. If this happens, you should use the infinity setting. Click here to see the details.
In some situations, it is difficult to focus correctly. For example, your subjects are not in the center, or you intentionally put your subjects near the edge. In this case, if you focus as usual, the background will be in focus while your subjects may be out of focus. If this happens, you should pick the main subject, and follow the procedure below:
|

|
| Far main subject | Near main subject |
| Click on the picture to see a larger one | |
In the M-REC mode, 995 has a very nice focusing capability. It allows you to select one of the five focus areas so that you perhaps do not need focus lock at all. Click here to see the details.
Note that when you lock focus, automatic exposure is also locked. More precisely, when the shutter release button is pressed halfway down to lock the focus, the camera also does an exposure reading of the subject and locks to this reading. Therefore, when the shutter released button is pressed all the down, the camera will use both the locked focus and the locked exposure. Click here to learn more about 995's exposure system.
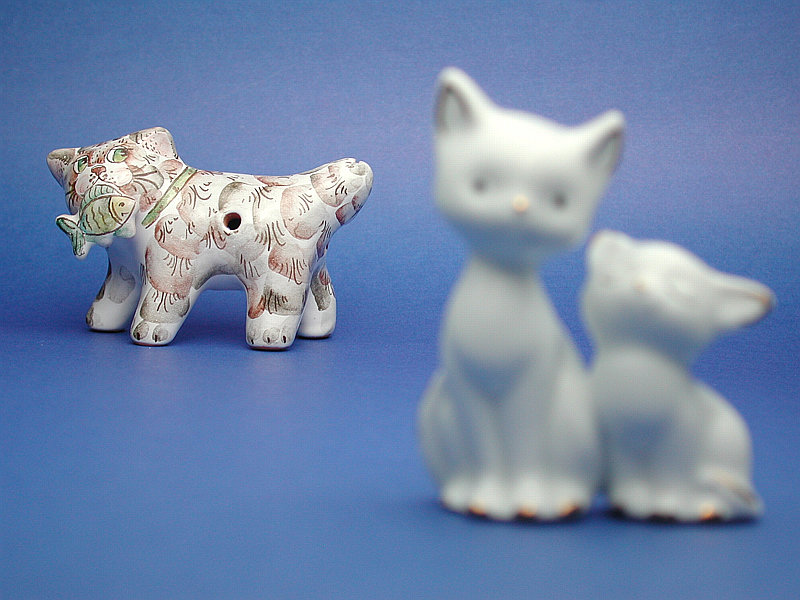
Autofocus cameras usually fail if you aim them at the following subjects:
The images below demonstrate an autofocus problem. We want to take a photo of a bird cage hanging on a wire. Because the cage is relatively small and the background is quite complex, the autofocus system is confused and focuses incorrectly, and, as a result, the main subject (i.e., the bird cage) is blurred and almost invisible. This is the left image below. If we focus on a near by subject, in this case the pole and the wire, the cage will be in focus and pops up as shown in the right image below. So, use focus lock wisely when you sense that the lens is hunting (i.e., going back and forth to find the correct focus distance).

|
|
| Blurred subject | Subject in focus |
| Click on the picture to see a larger one | |
Both viewfinder and LCD monitor can be used for focus and composition. Which one is better? Here are a few notes:
Now you know the basic mechanism of autofocus, in the next few pages, we shall talk about the following:
| Feature | Mode | What it can do for you |
| Distant Subjects | A-REC M-REC |
This feature is useful when the subjects are very far away such as landscape. Click here to check it out. |
| Macro Photography | A-REC M-REC |
This feature is useful when you have to bring the camera very close to the subjects (e.g., insects, flowers, jewelry and coins). Click here to check it out. |
| Autofocus Mode | A-REC M-REC |
You can force the camera to continually perform focusing; or, do it when you press the shutter release button halfway down. Click here to check it out. |
| Autofocus Area Selection | M-REC | Nikon Coolpix 995 has five autofocus sensors for you to choose from. Thus, focus lock may be unnecessary for most situations. Click here to check it out. |
| Focus Confirmation | M-REC | Sometimes you may not be very sure about if the most important subjects are in focus even though the camera's AF is on. If you turn on this focus confirmation capability, subjects that are in focus will be outlined so that you will know if those important subjects are in focus. Click here to check it out. |
| Manual Focus | M-REC | If you have to focus manually, this is the option you should not miss. Autofocus cameras are not always very smart and may be fooled by many strange situations (e.g., low light). If you can determine the distance between your subjects and the camera, manual focus is available for you to use. Click here to check it out. |